Raven Queen Bed Assembly Instructions
Assembling furniture can often be a daunting task. However, with clear instructions and a methodical approach, the process can be significantly simplified. This article provides a comprehensive guide to assembling the Raven Queen Bed, ensuring a smooth and efficient construction process. Following these instructions carefully will result in a sturdy and correctly assembled bed frame.
1. Inventory and Preparation
Before beginning assembly, it is crucial to inventory all components and hardware included in the packaging. Compare the received items against the parts list provided in the instruction manual. This step ensures that all necessary parts are present and avoids potential delays during assembly. Locate all the necessary tools, typically including an Allen wrench or hex key, which are usually provided with the bed frame. Having the correct tools readily available streamlines the assembly process.
Choose a clean, spacious area for assembly to prevent damage to the bed frame components and provide ample working space. Laying down a protective covering, such as a blanket or cardboard sheet, can prevent scratches to the floor and the bed frame during assembly. Keep the instruction manual close at hand for easy reference throughout the process.
2. Headboard Assembly
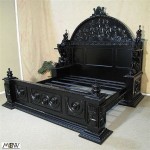
The headboard is often the first component to be assembled. Typically, the headboard consists of two side panels and a connecting top piece. Align the side panels with the designated slots or holes on the top piece. Using the provided hardware and tools, secure the connections by tightening the bolts or screws. Ensure that all connections are firmly tightened to provide stability and prevent wobbling.
Some Raven Queen Bed models may feature decorative elements on the headboard. If present, these elements should be attached according to the specific instructions provided in the manual. Carefully align the decorative pieces with the designated locations on the headboard and secure them using the appropriate hardware.
3. Footboard and Side Rail Assembly
Following headboard assembly, proceed with the footboard construction. Similar to the headboard, align the footboard side panels with the connecting top piece and secure them using the appropriate hardware and tools. Ensure all connections are firmly tightened to maintain the structural integrity of the bed frame.
Next, attach the side rails to the headboard and footboard. Identify the designated connection points on both the headboard and footboard, typically located on the inner sides. Align the side rails with these connection points and secure them using the provided hardware, ensuring they are firmly tightened.
Some models may utilize center support legs for added stability. If included, attach these support legs to the center of the side rails, using the designated brackets and hardware. This central support enhances the bed frame's weight-bearing capacity and prevents sagging.
4. Slat Support System Installation
The slat support system provides the foundation for the mattress. Carefully lay out the slats across the side rails, ensuring they are evenly spaced and fit securely within the designated support brackets or grooves. Some models may require the slats to be interlocked or connected using provided hardware. Consult the instruction manual for specific guidance on slat installation.
Once the slats are in place, double-check that they are evenly spaced and securely positioned. This ensures proper weight distribution and prevents the mattress from sagging or becoming uneven.
5. Final Inspection and Mattress Placement
After completing all assembly steps, conduct a thorough inspection of the entire bed frame. Ensure that all connections are securely tightened and that there are no loose parts or hardware. Gently shake the bed frame to confirm its stability and check for any wobbling or creaking sounds. Address any issues immediately by tightening loose connections or re-evaluating the assembly steps.
Once the bed frame is deemed stable and secure, carefully place the mattress on top of the slat support system. Ensure that the mattress is evenly positioned on the frame. The bed is now ready for use.

Elements International Bed Components Raven Rv100qcr Rails Slats From Eddins Furniture

Raven S Point Upholstered Bed Costco

Raven Industrial Vintage Metal Pipe Bed Saracina Home Target

King Raven Industrial Vintage Metal Pipe Bed Broe Saracina Home Target

Leffler Home Eden Queen Upholstered Headboard In Blake Raven 11000 11 79 01 The Depot

How To Assemble A Platform Bed

Queen Industrial Wood And Metal Bed Saracina Home Target

How To Assemble A Platform Bed

Elements International Bed Components Raven Rv222kh King Headboard From Eddins Furniture

Leffler Home Eden Queen Upholstered Headboard In Blake Raven 11000 11 79 01 The Depot