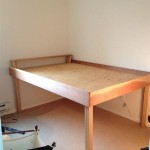
DIY Queen Size Storage Bed Frame: A Step-by-Step Guide
Building a queen size storage bed frame from scratch is a rewarding project that adds both style and functionality to your bedroom. With the right tools and materials, you can create a sturdy and spacious bed frame that will last for years to come.
Materials You'll Need
- 8x 2x4s (8 feet long)
- 8x 2x6s (8 feet long)
- 4x 2x8s (8 feet long)
- 3/4-inch plywood (4x8 feet)
- Wood screws (3-inch and 2-inch)
- Wood glue
- Corner clamps
- Sandpaper or sander
- Paint or stain (optional)
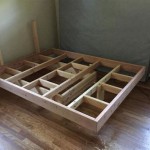
Step 1: Building the Side Rails
Start by cutting the 2x4s to the following lengths: 4x 75 inches, 4x 45 inches. These will form the side rails of the bed frame. Assemble the side rails on a flat surface using 3-inch wood screws. Make sure the 75-inch pieces are on the outside and the 45-inch pieces are on the inside.
Step 2: Adding the Cross Supports
Cut the 2x6s to the following lengths: 4x 60 inches. These will serve as the cross supports for the side rails. Position the cross supports evenly along the inside of the side rails and secure them with 3-inch wood screws.
Step 3: Creating the Headboard and Footboard
Cut the 2x8s to the following lengths: 2x 60 inches, 2x 72 inches. These will form the headboard and footboard. Assemble the headboard and footboard by attaching the 60-inch pieces to the top and bottom of the 72-inch pieces using 3-inch wood screws.
Step 4: Assembling the Frame
Join the headboard, footboard, and side rails to form the bed frame. Attach the side rails to the headboard and footboard with 3-inch wood screws. Use corner clamps to ensure a snug fit.
Step 5: Creating the Platform
Cut the plywood to 60x80 inches. This will form the platform that supports the mattress. Place the plywood on top of the bed frame and secure it with 2-inch wood screws spaced approximately 6 inches apart.
Step 6: Finishing Touches
Sand any rough edges or splinters on the bed frame. Apply wood glue to the joints for added strength. If desired, paint or stain the bed frame to match your bedroom décor. Allow the paint or stain to dry completely before placing the mattress on the bed frame.
Conclusion
Congratulations! You have now successfully built a queen size storage bed frame DIY. This sturdy and stylish bed frame will not only elevate your bedroom décor but also provide ample storage space for bedding, blankets, and other belongings. Enjoy the fruits of your labor and the satisfaction of creating a unique and functional piece for your home.

How To Build A Queen Size Storage Bed Addicted 2 Diy

Diy Full Or Queen Size Storage Bed Shanty 2 Chic

Diy Queen Bed Frame With Storage Plans Wilker Do S

How To Build A Queen Size Storage Bed Addicted 2 Diy

Brandy Scrap Wood Storage Bed With Drawers Queen Ana White

Diy Platform Bed With Storage Modern Builds

Queen Size Platform Bed Frame With Storage Drawers Sawdust Girl

Full Size Bed Designs Diy Storage Platform Frame

How To Build A Queen Size Storage Bed Addicted 2 Diy

Queen Size Bed With Storage
Related Posts