Queen Size Bunk Beds Diy: A Step-by-Step Guide to Building Your Own Custom Bed
Building a queen size bunk bed can be a daunting task, but it is definitely possible with the right tools and materials. In this guide, we will walk you through the entire process, from gathering materials to finishing the bed. We will also provide tips and tricks to make the process as easy as possible.
Materials You Will Need:
- 2 x 4s for the frame
- 2 x 6s for the slats
- 3/4-inch plywood for the decking
- 1/2-inch plywood for the headboard and footboard
- 1 x 4s for the trim
- Screws
- Nails
- Wood glue
Tools You Will Need:
- Circular saw
- Drill
- Countersink bit
- Hammer
- Screwdriver
- Clamps
- Level
- Tape measure
Step-by-Step Instructions:
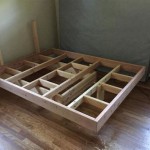
Step 1: Build the Frame
The first step is to build the frame of the bunk bed. The frame will consist of two side rails, two end rails, and four legs. To build the side rails, cut two 2 x 4s to the desired length of the bed. Then, cut four 2 x 4s to the desired height of the bed. Attach the legs to the side rails using 3-inch screws. Then, attach the end rails to the side rails using 2-inch screws.
Step 2: Install the Slats
The next step is to install the slats. The slats will support the plywood decking. To install the slats, cut six 2 x 6s to the length of the bed. Then, space the slats evenly across the frame and attach them using 1 1/2-inch screws.
Step 3: Install the Decking
The next step is to install the plywood decking. The decking will provide a solid surface for the mattress. To install the decking, cut a piece of 3/4-inch plywood to the size of the frame. Then, place the plywood on top of the slats and attach it using 1 1/4-inch screws.
Step 4: Build the Headboard and Footboard
The next step is to build the headboard and footboard. The headboard and footboard will give the bunk bed a finished look. To build the headboard, cut a piece of 1/2-inch plywood to the desired size. Then, attach the headboard to the top of the frame using 1 1/2-inch screws. To build the footboard, cut a piece of 1/2-inch plywood to the height of the frame. Then, attach the footboard to the bottom of the frame using 1 1/2-inch screws.
Step 5: Install the Trim
The final step is to install the trim. The trim will cover the edges of the plywood and give the bunk bed a professional finish. To install the trim, cut four pieces of 1 x 4 to the length of the sides of the bed. Then, attach the trim to the edges of the plywood using 1-inch screws.
Tips and Tricks:
* Use a level to make sure that the frame is level before attaching the decking. * Use a countersink bit to countersink the screws so that they are flush with the surface of the wood. * Use wood glue to help hold the joints together. * If you are not confident in your ability to build a queen size bunk bed, you can purchase a kit from a home improvement store.
17 Easy Steps For A Diy Built In Bunk Bed Start At Home Decor

How To Build An Easy Diy Queen Size Loft Bed For S Thediyplan

Free Diy Furniture Plans How To Build A Queen Sized Low Loft Bunk Bed The Design Confidential

Multifunctional Queen Size Bunk Bed With Storage Area Plan

How To Build A Diy Queen Size Loft Bed With Desk Thediyplan

17 Easy Steps For A Diy Built In Bunk Bed Start At Home Decor

Queen Builtin Bunks Reveal Honey Built Home

How To Build A Built In Bunk Bed Plank And Pillow

Diy Queen Loft Bed Frame Plans Rannels Rustic Log Build A Beds Murphy

Queen Loft Bed Plans Palmetto Bunk