Plans to Build a Queen-Size Bed Frame: A Comprehensive Guide
Building a bed frame is an excellent way to save money and create a unique piece of furniture that fits your style and bedroom decor perfectly. Constructing a queen-size bed frame is a relatively straightforward project that can be completed in a weekend with the right tools and materials. This guide will provide comprehensive instructions, step-by-step plans, and tips to help you build a sturdy and stylish bed frame for your queen-size mattress.
Materials and Tools Required:
- Pressure-treated 4x4 lumber for the legs (4 pieces, 54 inches long)
- Pressure-treated 2x6 lumber for the side rails (2 pieces, 80 inches long)
- Pressure-treated 2x6 lumber for the headboard and footboard (2 pieces, 60 inches long)
- 1/2-inch plywood for the bed slats (1 sheet, 48 inches by 96 inches)
- 3-inch wood screws
- 2-inch wood screws
- Wood glue
- Drill
- Circular saw
- Miter saw
- Sandpaper
- Measuring tape
- Level
Step-by-Step Instructions:
1. Cut the Lumber:
Use the miter saw to cut the 4x4 legs at 54 inches long. Cut the 2x6 side rails at 80 inches long, and the 2x6 headboard and footboard at 60 inches long.
2. Assemble the Legs and Side Rails:
Attach the 4x4 legs to the corners of the side rails using 3-inch wood screws. Make sure the legs are flush with the bottom edge of the side rails and perpendicular to the ground.
3. Attach the Headboard and Footboard:
Place the headboard and footboard between the side rails, making sure they are centered. Secure them with 3-inch wood screws.
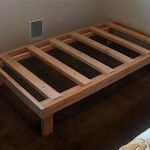
4. Cut and Install the Bed Slats:
Measure the distance between the side rails inside the bed frame and cut the 1/2-inch plywood to fit. Place the plywood on top of the side rails and secure it with 2-inch wood screws.
5. Sand and Finish:
Sand the entire bed frame with sandpaper to smooth any rough edges. Apply wood glue to the joints for added strength and stability. You can also paint or stain the bed frame to match your decor.
Tips for Building a Sturdy Bed Frame:
- Use pressure-treated lumber for all components to prevent rot and decay.
- Make sure the joints are secure by using wood glue and screws.
- Check the level of the bed frame before attaching the bed slats to ensure it is stable.
- Allow the wood glue to dry completely before applying any weight to the bed frame.
- Consider adding decorative molding or trim to the headboard and footboard for a more polished look.
Conclusion:
Building a queen-size bed frame is a rewarding project that can add functionality and style to your bedroom. By following these detailed plans and using quality materials, you can create a sturdy and durable bed frame that will provide you with years of comfortable sleep. Enjoy the satisfaction of creating your own furniture and the savings that come with DIY projects.

Queen X Barn Door Farmhouse Bed Plan Her Tool Belt

Simple Queen Bed Frame Diy Plans

Chestwick Platform Bed Queen Size Frame Diy Plans

Diy Bed Frame Wood Headboard 1500 Look For 200 A Piece Of Rainbow

Diy West Elm Chevron Bed Free Plans
:max_bytes(150000):strip_icc()/Metal-Strap-Bed-876f11a91f08411ab867e4c81b0c19e2.jpg?strip=all "16 Free Diy Bed Plans For S And Children")
16 Free Diy Bed Plans For S And Children

Queen Bed Frame Plans Howtospecialist How To Build Step By Diy

Diy Bed Frame Wood Headboard 1500 Look For 200 A Piece Of Rainbow

Queen Size Platform Bed Frame With Storage Drawers Sawdust Girl

Queen Bed Frame Plans Howtospecialist How To Build Step By Diy