Malm Queen Size Bed Assembly Instructions: A Step-by-Step Guide
The IKEA Malm queen-size bed is a popular choice for its sleek design, affordability, and ease of assembly. However, like any furniture piece from IKEA, assembling the Malm queen-size bed can be a bit of a challenge, especially for first-time builders. This article will provide a comprehensive step-by-step guide to help you successfully assemble your Malm bed.
Step 1: Unpacking and Preparing
The first step is to carefully unpack the bed frame and its components. Make sure to check for any missing parts or damaged pieces before you begin assembly. Lay out all the parts in a spacious area, ensuring a clear work surface. This will make it easier to identify and locate the components you need during the assembly process. You will also require a Phillips head screwdriver, a rubber mallet, and a tape measure for this task.
Step 2: Assembling the Headboard
Start by assembling the headboard. Carefully align the two headboard side panels and connect them using the provided screws. You will need to use the rubber mallet to carefully tap the screws into place. Ensure that the screws are fully tightened to ensure the headboard's stability. If the headboard has a slatted design, follow the instructions for connecting the slats to the headboard frame.
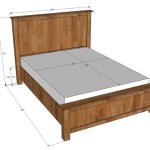
Step 3: Assembling the Bed Frame
Next, assemble the bed frame. This usually involves connecting the side rails to the footboard and headboard using provided screws. Again, use the rubber mallet to carefully secure the screws. If the bed frame has a slatted design, be sure to install the slats according to the provided instructions. The Malm queen-size bed typically has slats for supporting the mattress and box spring so ensure that they are installed correctly.
Step 4: Attaching the Headboard to the Bed Frame
Once the headboard and bed frame are assembled, carefully connect them. Typically, this involves attaching the headboard to the side rails using screws and brackets. This will create a stable and secure structure for your new bed. Double-check that all the screws are fully tightened to prevent wobbling.
Step 5: Installing the Mattress Support
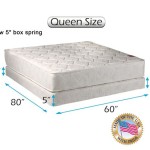
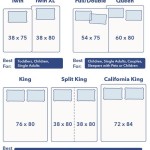
The final step is to install the mattress support, which is usually a slatted base or a solid panel. The mattress support should be securely attached to the bed frame using the provided instructions. Do not place the mattress on the frame until the mattress support is properly installed. Be sure to position the mattress support according to the bed's dimensions to ensure proper alignment and stability.
Step 6: Final Touches
After assembling the Malm queen-size bed, it's important to check for any loose screws or wobbly parts. Tighten any loose screws, and if necessary, use the rubber mallet to tap any wobbly components into place. Finally, place your mattress and box spring on the assembled bed frame. Make sure the mattress is centered and lies flat on the mattress support.
Troubleshooting Common Malm Bed Assembly Issues
While the Malm queen-size bed is relatively simple to assemble, you might encounter some common issues. Here are some tips for troubleshooting:
- Missing or Damaged Parts: If you're missing any parts or find damaged pieces, contact IKEA customer service. They can provide replacements or instructions on how to proceed.
- Difficulty Tightening Screws: If you're struggling to tighten screws, use a screwdriver with a good grip. In some cases, a bit of WD-40 can help loosen stubborn screws.
- Wobbling or Unstable Bed: If the bed is wobbly, check that all screws are fully tightened and that the parts are properly aligned. If the issue still persists, it may be necessary to contact IKEA customer service for assistance.
Tips for Malm Queen Size Bed Assembly
Here are some additional tips for successfully assembling your Malm queen-size bed:
- Read the Instructions Carefully: Before you begin, read the assembly instructions thoroughly. This will ensure you understand each step and avoid any potential mistakes.
- Lay Out the Parts: Before you start assembling, lay out all the parts in a clear and organized way. This will help you easily identify and locate the components you need.
- Take Your Time: Assembling a bed can take some time, so don't rush the process. Taking your time will help you avoid mistakes and ensure a stable and well-constructed bed.
- Use the Right Tools: Make sure you have the right tools on hand, including a Phillips head screwdriver, a rubber mallet, and a tape measure. This will make the assembly process easier and more efficient.
- Ask for Help if Needed: If you're struggling with a particular step or are unsure about anything, don't hesitate to ask for help from a friend or family member.
By following these instructions and tips, you can assemble your Malm queen-size bed with confidence and enjoy a comfortable and stylish sleeping experience. Remember to always check for loose parts and tighten any screws before using your new bed.

Malm Bed Frame High Replacement Parts Furnitureparts Com

Assembly Of Beds Furniture Delivery And Service In Brooklyn Nyc

Malm High Bed Frame 4 Storage Boxes Black Brown Full Queen And King Beds Furniture Factories Suppliers Manufacturers In Asia Vietnam Cainver

Malm Bed Assembly Detailed Walkthrough Instructional

Malm Tall Platform Bed Frame Queen W Lonset Deluxe Slats Perfect D

Malm Queen Size Pull Up Storage Bed Self Installation Detailed

Malm Bed Frame High Black Brown Lönset Full Queen And King Beds Furniture Factories Suppliers Manufacturers In Asia Vietnam Cainver

Malm Modernash Furniture Supply Corporation

Malm Double Bed Frame Assembly