How To Put Two Queen Beds Together
Combining two queen beds can create a spacious sleeping arrangement suitable for families, accommodating guests, or simply enjoying an expansive sleep surface. This process involves more than just pushing the beds together; careful consideration of mattress types, frame compatibility, and gap-filling solutions ensures a seamless and comfortable experience.
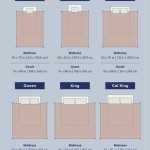
Assessing Mattress and Frame Compatibility: Before physically joining the beds, assess the existing mattresses and frames. Ideally, the mattresses should be of similar type and height. Significant differences in height or firmness can create an uncomfortable ridge or slope. Matching box springs or platform beds are also essential for structural integrity and stability. If the frames have different heights, consider adding risers or shims to create an even surface.
Preparing the Room and Beds: Clear the area around the beds to provide ample working space. Strip the beds of all bedding, including sheets, blankets, and mattress pads. This allows for easier maneuvering and prevents damage to the bedding during the joining process. If possible, move the beds slightly away from the walls to improve access.
Joining the Frames: With the beds prepared, begin joining the frames. For frames with similar designs, joining brackets or plates can provide a secure connection. These brackets are typically attached to the frame's side rails and tightened with bolts or screws. Alternatively, if the frames are not designed for joining, strong ratchet straps can be used. Wrap the straps around the frames’ side rails and tighten securely. Ensure the straps are taut but not over-tightened to prevent damage to the frames.
Addressing the Gap: A common challenge when joining two beds is the unavoidable gap created between the mattresses. This gap can be uncomfortable and disrupt sleep. Several solutions can effectively bridge this divide.
Using a Mattress Connector: A mattress connector, also known as a bed bridge, is specifically designed to fill the gap between two mattresses. These connectors typically consist of a high-density foam piece covered in a soft fabric. Place the connector over the joined mattresses, covering the gap completely. Some connectors come with straps that secure to the mattresses underneath, ensuring the connector stays in place.
Creating a DIY Gap Filler: If a commercial mattress connector is not available, a DIY solution can be implemented. Folding a thick comforter, duvet, or blanket and placing it in the gap can provide a temporary solution. Foam pool noodles or rolled-up towels can also be used to fill the space but may provide less cushioning.
Adding a Mattress Topper: Covering both mattresses with a single, large mattress topper is an effective way to create a seamless sleeping surface and minimize the feeling of the gap. Choose a topper that complements the existing mattresses in terms of material and thickness. Ensure the topper is large enough to cover the entire combined sleeping area, extending beyond the edges of the gap.
Securing the Mattresses: Once the gap is addressed, it is important to secure the mattresses together. This prevents them from shifting apart during the night. Fitted sheets designed for larger mattress sizes, such as king or California king, can be used to enclose both mattresses. Alternatively, two fitted sheets can be used on each mattress individually, and then a large flat sheet can be placed over the top for a cohesive look.
Making the Bed: With the mattresses joined and secured, the bed can be made as usual. Use bedding appropriate for the combined size of the two mattresses. Tuck the sheets and blankets firmly between the mattresses and along the sides of the bed to create a smooth, even surface. Add pillows and other decorative elements as desired.
Regular Maintenance: Once the beds are joined, periodic checks are necessary to ensure the connection remains secure and the gap filler stays in place. Tighten any straps or bolts that may have loosened over time. Fluff and reposition the gap filler as needed. Regularly rotating and flipping the mattresses, if applicable, can help maintain even wear and prolong their lifespan. This process also ensures consistent comfort across the joined sleeping surface.
Disassembling the Joined Beds: When the need for a combined sleeping surface no longer exists, the beds can be readily disassembled. Remove all bedding and the gap filler. Detach any joining brackets or loosen the ratchet straps. Carefully separate the frames and return them to their original positions. Re-dress the individual beds with their original bedding.
By meticulously executing these steps, a comfortable and aesthetically pleasing combined sleeping area can be achieved. Careful planning and attention to detail ensure a seamless transition from two individual beds to a larger, more accommodating sleep surface.

The Bed Supersize It

The Bed Supersize It

Idk If This Is Two Queen Beds Put Together Or A And King But Omg I Need One Home Decor Bedroom Dream House Future Apartment

Make Two Beds Into One With Foam Bed Bridges Factory Inc Blog

Pin By Kelsey Kimble On Design Ideas In 2024 Queen Size Sleeper Sofa Bed Living Room Bedding

Two Queen Beds Strapped Together Picture Of The Westin Resort Spa Puerto Vallarta Tripadvisor

Make Two Beds Into One With Foam Bed Bridges Factory Inc Blog

We Put Two Full Size Beds Together So Could Still Sleep Yet Have Our Own Space Bedroom Diy Design Master Bedrooms Decor

Two Queen Beds Put Together Make The Double Room Picture Of Factory Hotel Muenster Tripadvisor

Create A King Instant Bed Connector With 2 Inch Safety Strap For Twin Beds Murphy Plans Two Xl Bedding
Related Posts