How To Put Together A Queen Bed Frame
Assembling a queen bed frame can seem daunting, but with the right tools and approach, it can be a straightforward process. This article will guide you through the steps of putting together a queen bed frame, from unpacking the box to securing the final piece. Whether you're a seasoned DIYer or a novice, following these steps will ensure a smooth and successful assembly experience.
Essential Tools and Materials
Before you begin assembling your queen bed frame, gather the following essential tools and materials. Having everything readily accessible will streamline the process and prevent delays:
- Phillips Head Screwdriver: Essential for driving screws into the various components of the bed frame.
- Adjustable Wrench: Useful for tightening bolts and nuts, especially for metal bed frames.
- Rubber Mallet: Helps to gently tap pieces into place without damaging them.
- Level: Ensures that the bed frame is level for stability and comfort.
- Tape Measure: Useful for confirming dimensions and ensuring accurate placement.
- Safety Glasses: Protect your eyes from potential debris during assembly.
- Work Gloves: Provide a comfortable grip and protection from sharp edges.
Step-by-Step Assembly Guide
Follow these step-by-step instructions to assemble your queen bed frame:
1. Unpack and Inspect
Begin by carefully unpacking the bed frame from its box. Inspect all parts for any damage or missing pieces. Refer to the included assembly instructions for a complete list of components. If any parts are damaged or missing, contact the manufacturer immediately for replacements.
2. Assemble the Headboard
The headboard is typically the first component to be assembled. Carefully align the headboard side panels and attach them to the headboard center piece using the supplied screws. Refer to the instructions for the specific screw locations. Ensure that all screws are securely fastened.
3. Assemble the Footboard
The footboard assembly process is similar to the headboard. Connect the footboard side panels to the footboard center piece, using the provided screws. Double-check that all screws are tight and secure before moving onward.
4. Attach the Side Rails
Once the headboard and footboard are assembled, it's time to attach the side rails. Connect the side rails to the headboard and footboard using the designated attachment points and screws. Make sure the side rails are aligned with the headboard and footboard, creating a rectangular shape. Adjust the side rails if necessary to ensure a perfect fit.
5. Install Support Slats
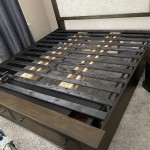
Many queen bed frames utilize support slats for optimal weight distribution and mattress support. Insert the support slats into the designated slots on the side rails. Ensure all slats are securely in place before proceeding to the next step.
6. Attach the Center Support
Some queen-sized bed frames require a center support for added stability, especially for heavier mattresses. Align the center support with the side rails and secure it using the provided screws or bolts. Check that the center support is firmly attached to the side rails.
7. Position the Bed Frame
Once all components are assembled, carefully position the bed frame in its desired location in the bedroom. Make sure the bed frame is placed on a level surface to avoid unevenness and potential instability.
8. Level the Bed Frame
Use a level to ensure that the bed frame is completely level. If necessary, adjust the feet or legs of the bed frame to achieve perfect levelness. A level bed frame provides stability and comfort, ensuring your mattress sits properly and prevents any sagging or unevenness.
Additional Tips for Assembly
Here are some additional tips to make the assembly process smoother and more efficient:
- Read the instructions carefully. Before starting, familiarize yourself with the assembly instructions. This will prevent any confusion and ensure that you follow the correct steps.
- Work in a well-lit area. Adequate lighting is important for seeing the details of the instructions and ensuring all screws are correctly installed.
- Take your time. Rushing through the assembly process can lead to mistakes. Take your time and double-check each step before moving on to the next.
- Save the hardware. Do not discard any of the hardware or screws provided with the bed frame. You might need them later for adjustments or repairs.
- Clean up afterwards. Once the assembly is complete, dispose of any packaging materials responsibly and clean up any debris or dust created during the process.

Mantua I 115pr Queen Bed Frame Setup

Mantua I Pk170 Queen Size Assembly

How To Assemble A Queen Bed Frame Steel Malouf

Queen X Barn Door Farmhouse Bed Plan Her Tool Belt

How To Build A L Shaped Desk Mid Century Modern Diy Builds

Diy Bed Frame Wood Headboard 1500 Look For 200 A Piece Of Rainbow

Super Simple Queen Bed Frame Diy In A Day

Easy To Build Diy Bed Houseful Of Handmade

Diy Full Or Queen Size Storage Bed Shanty 2 Chic

Chestwick Platform Bed Queen Size Frame Diy Plans

