A Comprehensive Guide to Crafting a Majestic Queen Platform Bed
Building a queen platform bed is a rewarding endeavor that can transform your bedroom into a tranquil haven. By following these detailed instructions, you can create a sturdy and stylish bed that will elevate your sleep experience.
Materials:
- 1x12 pine boards (4 for side rails, 2 for footboard, 2 for headboard)
- 2x4 pine boards (5 for crossbars, 5 for slats)
- Wood screws (2 1/2-inch and 1 5/8-inch)
- Wood glue
- Clamps
- Drill
- Countersink bit
- Sandpaper
- Paint or stain (optional)
Step 1: Assemble the Side Rails
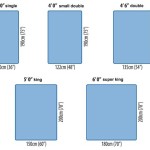
Cut the 1x12 pine boards to the desired length of the bed. Typically, this is around 80 inches for a queen-size bed. Join the boards together in a rectangular frame using 2 1/2-inch wood screws every 6 inches. Reinforce the joints with wood glue and clamps for extra strength.
Step 2: Construct the Crossbars
Cut the 2x4 pine boards to a length of 54 inches. These will serve as the crossbars that support the slats. Place the crossbars evenly spaced within the side rails and secure them with 2 1/2-inch wood screws.
Step 3: Attach the Slats
Cut the remaining 2x4 pine boards to a length of 76 inches. These will form the slats that provide support for the mattress. Space the slats approximately 3 inches apart and attach them to the crossbars using 1 5/8-inch wood screws.
Step 4: Build the Headboard and Footboard
Cut the 1x12 pine boards for the headboard and footboard to the desired height and design. Attach them to the side rails using wood screws and glue. To enhance durability, you can reinforce the joints with angle brackets.
Step 5: Sand and Finish
Sand the entire bed frame to remove any rough edges or splinters. You can paint or stain the bed to match your bedroom décor. Allow the finish to dry completely before assembling the bed.
Step 6: Assemble the Platform Bed
Lay the side rails flat on the floor and insert the crossbars into the notches. Secure the crossbars with screws. Next, place the slats on top of the crossbars and secure them. Finally, attach the headboard and footboard to the side rails. Double-check the stability of the bed by ensuring all joints are tight.
Congratulations! You have successfully crafted a queen platform bed that will provide you with many years of restful slumber. Enjoy the satisfaction of a well-made piece of furniture that enhances both the aesthetics and functionality of your bedroom.

How To Build A Modern Platform Bed For 125 Diy Beautify Creating Beauty At Home

Essential Platform Bed Frame Ana White

Easy Diy Platform Bed Frame For A King With Instructions

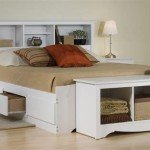
Diy Full Or Queen Size Storage Bed Shanty 2 Chic

How To Build A L Shaped Desk Mid Century Modern Diy Builds

Easy Low Waste Platform Bed Plans Diy Frame Bedroom

How To Build An Easy Bed Platform Maker Gray

Queen Size Platform Bed Frame With Storage Drawers Sawdust Girl

Diy 5 Minutes Bed Frame

Diy Bed Frame Wood Headboard 1500 Look For 200 A Piece Of Rainbow
Related Posts