The Essential Guide to Creating the Perfect Queen-Size Loft Bed
Loft beds offer a smart and stylish solution for maximizing space in a bedroom. With a queen-size platform elevated above the ground, loft beds create a cozy sleeping nook while freeing up valuable floor area. Assembling a queen loft bed may seem like a daunting task, but it's actually quite simple with the right tools and instructions. This comprehensive guide will provide you with all the essential aspects to consider for a successful DIY queen loft bed project.
Planning and Preparation
Before embarking on the assembly process, it's crucial to plan and prepare thoroughly. Measure the available space in your bedroom to ensure the bed fits comfortably. Determine the desired bed height, considering the ceiling height and any potential obstructions. Gather all necessary tools, including a drill, screwdriver, wrench, hammer, and measuring tape. Additionally, sort and organize the bed components to streamline the assembly process.
Assembling the Base and Frame
The base of the loft bed provides the foundation for the entire structure. Start by assembling the legs of the bed by connecting them to the side panels using bolts or screws. Once the base is complete, attach the corner braces for added stability. Next, assemble the ladder that leads up to the loft platform. Follow the manufacturer's instructions carefully, ensuring that each step is secure before moving on to the next.
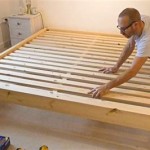
Creating the Loft Platform
The loft platform serves as the sleeping surface of the bed. Position the pre-cut slats across the side panels and secure them firmly. These slats will support the mattress and provide a comfortable base for your sleep. Check the manufacturer's recommendations for the spacing and attachment of the slats to ensure proper mattress support.
Installing the Safety Railings
Safety railings are essential for preventing falls from the loft bed. Measure and cut the guardrails according to the provided instructions. Use brackets or screws to attach the guardrails to the platform's edges, ensuring they are securely fastened and stable. Consider additional safety measures such as installing a ladder-lock and guardrail nets for enhanced protection.
Finishing Touches
With the main structure complete, add the finishing touches to personalize your loft bed. Paint or stain the bed frame and ladder to match your bedroom decor. Add under-bed storage containers or drawers to maximize space utilization. Consider installing a curtain or canopy around the sleeping area for added privacy and ambiance. Finally, place your mattress and bedding on the platform to complete the assembly.
Congratulations! You have successfully created a queen-size loft bed that enhances the functionality and aesthetics of your bedroom. Enjoy the newfound space and the comfort of sleeping elevated above the ground.

How To Build An Easy Diy Queen Size Loft Bed For S Thediyplan

How To Build An Easy Diy Queen Size Loft Bed For S Thediyplan

Diy Full Size Loft Bed For S With Plans To Build Your Own Simplified Building

Free Diy Furniture Plans How To Build A Queen Sized Low Loft Bunk Bed The Design Confidential

How To Build A Diy Queen Size Loft Bed With Desk Thediyplan

Loft Bed Build Diy 120 Dollars Queen Size

Queen Loft Bed Plans

Diy Queen Loft Bed Frame Plans Rannels Rustic Log Build A Beds Murphy

How To Build A Diy Queen Size Loft Bed With Desk Thediyplan

Loft Frame Simple Plans Available From Their Site Bed Queen Beds