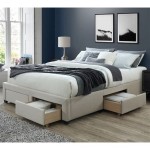
How to Build a Queen Bed Frame with Storage Drawers
Building a queen bed frame with storage drawers is a great way to add extra storage to your bedroom while also creating a stylish and functional piece of furniture. This project is relatively easy to complete, even for beginners, and the results are well worth the effort. Here's a step-by-step guide to help you get started:
Materials You'll Need:
- 1x8 pine boards (12 pieces, each 84 inches long)
- 2x4 pine boards (4 pieces, each 84 inches long)
- 1/2-inch plywood (1 piece, 60 inches x 84 inches)
- 1/4-inch plywood (1 piece, 54 inches x 84 inches)
- 3-inch wood screws
- 2-inch wood screws
- 1-1/2-inch wood screws
- Wood glue
- Clamps
- Sandpaper
- Paint or stain (optional)
Step 1: Build the Side Rails
Start by cutting the 1x8 pine boards to length. You'll need four pieces that are 84 inches long for the side rails. Assemble the side rails by attaching the 2x4 pine boards to the 1x8 pine boards with 3-inch wood screws. Make sure the 2x4 pine boards are flush with the top and bottom edges of the 1x8 pine boards.
Step 2: Attach the Headboard and Footboard
Cut the remaining 1x8 pine boards to length for the headboard and footboard. The headboard and footboard will each be made up of two pieces that are 60 inches long. Attach the headboard and footboard to the side rails using 2-inch wood screws. Make sure the headboard and footboard are centered on the side rails.
Step 3: Install the Drawer Slides
Cut the 1/2-inch plywood to size for the drawer bottoms. The drawer bottoms will each be 54 inches x 24 inches. Attach the drawer slides to the inside of the side rails, making sure they are evenly spaced. The drawer slides should be installed about 2 inches from the top and bottom of the side rails.
Step 4: Build the Drawers
Cut the 1/4-inch plywood to size for the drawer sides and backs. The drawer sides will each be 24 inches x 18 inches, and the drawer backs will each be 24 inches x 6 inches. Assemble the drawers by attaching the drawer sides and backs to the drawer bottoms with 1-1/2-inch wood screws. Make sure the drawer sides and backs are flush with the edges of the drawer bottoms.
Step 5: Install the Drawers
Slide the drawers into the drawer slides. Make sure the drawers are aligned properly and that they open and close smoothly.
Step 6: Finishing Touches
Sand the bed frame and drawers to smooth out any rough edges. Apply paint or stain to the bed frame and drawers, if desired. Allow the paint or stain to dry completely before using the bed frame.
Conclusion:
Building a queen bed frame with storage drawers is a great way to add extra storage to your bedroom while also creating a stylish and functional piece of furniture. This project is relatively easy to complete, even for beginners, and the results are well worth the effort. So what are you waiting for? Get started today!

How To Build A Queen Size Bed With Drawer Storage

Diy Queen Storage Bed W Drawers

Diy Queen Storage Bed W Drawers

Queen Bed Frame With Storage Plans

Diy Queen Bed Frame With Storage Plans Wilker Do S

Queen Size Platform Bed Frame With Storage Drawers Sawdust Girl

How To Build A Platform Bed With Storage Woodworking

Brandy Scrap Wood Storage Bed With Drawers Queen Ana White

How To Build A Bed With Drawers For Almost Free Brimnes

How To Build A Queen Bed Frame With Lot Of Storage
Related Posts