How to Make a Murphy Bed Hardware Kit
A Murphy bed, also known as a wall bed, is a space-saving furniture solution that folds away into a cabinet when not in use. If you're looking to maximize your living space, a Murphy bed can be a great option. But building one yourself can seem daunting. Luckily, there are readily available Murphy bed hardware kits that make the process much easier. This article will guide you through the steps of making a Murphy bed hardware kit using pre-assembled components.
Choosing the Right Murphy Bed Hardware Kit
The first step is selecting the right Murphy bed hardware kit. Here are some factors to consider:
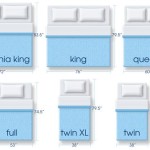
- Bed Size: Determine the size of the bed you want (e.g., full, queen, king) and make sure the kit you choose is compatible.
- Material: Kits are typically made from steel, aluminum, or a combination of both. Steel is generally more robust, while aluminum is lighter and more affordable.
- Features: Some kits include additional features like built-in storage compartments, lighting, or mechanisms for raising and lowering the bed with a push of a button.
- Weight Capacity: Ensure the kit can handle the weight of the mattress and any additional bedding.
- Installation Instructions: Check if the kit comes with clear and comprehensive installation instructions.
It's also a good idea to compare prices and read reviews from other customers before making your final decision. Consider visiting local home improvement stores or browsing online retailers to find the best deal.
Assembling the Murphy Bed Hardware Kit
Once you have your Murphy bed hardware kit, the next step is to assemble it. The specific instructions will vary depending on the kit you purchase, but here is a general overview of the process:
- Prepare the Workspace: Find a clean and spacious area where you can work comfortably.
- Read the Instructions: Carefully review the instructions provided with the kit before you start assembling. This will help you understand each step clearly and avoid any mistakes.
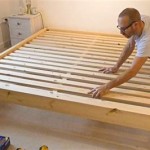
- Assemble the Frame: Most hardware kits consist of a sturdy frame that supports the mattress. This frame is usually assembled using pre-drilled holes and bolts. Follow the instructions carefully and ensure the frame is securely assembled.
- Install the Hinges: The hinges are responsible for allowing the bed to fold up and down. Install them according to the instructions, ensuring they are properly aligned and secured.
- Attach the Support Arms: The support arms are attached to the frame and provide stability when the bed is in the upright position. These are typically secured using bolts or screws.
- Install the Gas Springs: Gas springs help to lift and lower the bed smoothly. Follow the manufacturer's instructions for their installation and ensure they are correctly positioned.
- Attach the Cabinet: The Murphy bed hardware kit is designed to fit into a cabinet, which you will need to construct or have custom-built. Make sure the cabinet is the correct size and securely attached to the wall.
- Install the Bed and Mattress: Once the hardware is assembled, you can install the bed platform and mattress. Ensure the mattress is properly supported and secured.
Remember to take your time, follow the instructions carefully, and use the right tools for the job. If you're unsure about any step, it's always best to consult the manufacturer's instructions or seek assistance from a qualified professional.
Tips for Success
Here are some essential tips to ensure a smooth and successful Murphy bed hardware kit installation:
- Measure Twice, Cut Once: Careful measurements are crucial for a well-fitting Murphy bed. Double-check your measurements before making any cuts to the wood or materials.
- Use the Right Tools: Invest in a good set of tools, including a drill, screwdriver, tape measure, level, and saw. The right tools will make the assembly process much easier and ensure a quality finish.
- Seek Help When Needed: If you feel overwhelmed or unsure about any step, don't hesitate to seek help. You can find professional installers or ask a friend or family member for assistance.
- Test Before You Finish: Once the hardware is assembled, test it thoroughly before finishing the installation. This will help you identify any potential issues and address them before permanently securing the bed cabinet.
- Regular Maintenance: Like any piece of furniture, your Murphy bed will require regular maintenance. This includes keeping the hardware clean, lubricating the moving parts, and checking for any signs of wear and tear.
By following these steps, you can confidently assemble your Murphy bed hardware kit and create a functional and stylish piece of furniture that will save space and enhance your living area.

How To Build A Diy Murphy Bed Hardware Kit

Diy Murphy Wall Bed 5 Springs Mechanism Hardware Kit Fold Down For 0 9 1 2m Hm117 In Cabinet H Beds

Diy Wall Bed Hardware Kits Lift Stor Storage Beds

King Size Diy Murphy Bed Hardware And Stay Level Desk Combo Easy

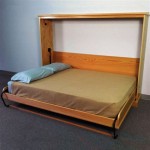
Diy Murphy Wall Bed Springs Mechanism Hardware Kit Horizontal

Vevor Diy Murphy Bed Hardware Kit Horizontal Mounting Wall Springs Mechanism Heavy Duty Support For Twin Size Com

Building A Murphy Bed Series Step 2 6 Lift Mechanism Assembly Engineer Your Space

Diy Next Bed Hardware Kits Lift Stor Storage Beds

Murphy Bed Hardware For Diy Nest Egg

Queen Size Murphy Bed Hardware Kit Horizontal Sideways Easy Diy