How to Construct a Murphy Bed Chest: A Comprehensive Guide
A Murphy bed chest is a versatile and space-saving solution that combines the functionality of a bed and a storage unit. If you're short on space or want a more organized and flexible living area, building your own Murphy bed chest is a rewarding project. Here's a detailed guide to help you achieve this:
Gather the Necessary Materials
Before you begin, ensure you have all the necessary materials on hand, including:
- Wood (pine, plywood, or MDF)
- Murphy bed hardware kit
- Mattress
- Handles or knobs
- Screws, bolts, and nails
- Wood glue
- Finishing materials (paint, stain, or veneer)
Design and Plan
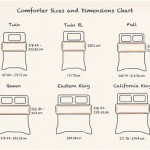
Determine the desired size and configuration of your Murphy bed chest. Sketch out a design plan that includes the dimensions of the chest, the bed platform, and the storage compartments. Consider the height of the mattress and the clearance space needed when the bed is folded up.
Build the Basic Structure
Start by constructing the main frame of the chest using wood. Assemble the sides, top, and bottom panels using wood glue and screws. Ensure the structure is square and sturdy. Next, build the bed platform using plywood or slats supported by a metal frame.
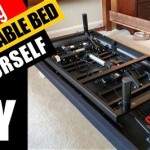
Install the Murphy Bed Hardware
Attach the Murphy bed hardware to the inside of the chest and the bed platform. Follow the manufacturer's instructions carefully to ensure proper alignment and smooth operation. The hardware will allow the bed to be folded up and down effortlessly.
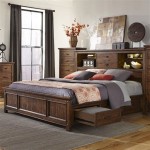
Add Storage Compartments
Design and build the storage compartments according to your needs. You can create drawers, shelves, or a combination of both. Use plywood or MDF for the compartments and ensure they fit snugly within the chest. Install handles or knobs for easy access.
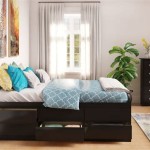
Install the Mattress
Place the mattress on the bed platform and secure it using straps or Velcro. Ensure the mattress is centered and flat for a comfortable sleeping experience.
Finishing Touches
Sand the chest to remove any rough edges or splinters. Apply your desired finish, whether paint, stain, or veneer. Add decorative elements such as molding or trim to enhance the appearance.
Conclusion
Building a Murphy bed chest is a rewarding project that provides a functional and space-saving solution for your living space. By following these steps and using proper techniques, you can create a custom-tailored piece that meets your specific needs and adds value to your home.

15 Diy Murphy Beds How To Build A Bed

Remodelaholic How To Build Faux Dresser Murphy Bed Diy Plans

Diy Murphy Bed Project From A Kit Girl Just

How To Build A Murphy Bed The Home Depot

15 Diy Murphy Beds How To Build A Bed

15 Diy Murphy Beds How To Build A Bed

Diy Murphy Bed Project From A Kit Girl Just

Woodsmith Murphy Bed Plans Wilker Do S

Diy Murphy Bed For Under 150 With Plans Your Modern Family

15 Diy Murphy Beds How To Build A Bed
Related Posts