How to Make a Loft Bed Queen Size
A loft bed offers a unique solution to space constraints, maximizing vertical space to create a cozy sleeping nook while leaving ample room for other activities below. If you're seeking a comfortable and space-saving solution for your bedroom, building a queen-size loft bed can be a rewarding project. This guide will walk you through the essential steps involved in creating this functional and stylish furniture piece.
Step 1: Planning and Design
Before embarking on the construction process, meticulous planning is crucial to ensure a successful outcome. Consider the following aspects:
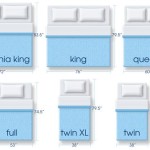
- Space Available: Measure the available space in your bedroom, taking into account the dimensions of the queen-size mattress (60 x 80 inches) and the desired height of the loft bed. Allow sufficient clearance above the bed for comfortable movement and headroom.
- Materials: Choose sturdy and durable materials like wood (pine, oak, or maple) or metal for the frame. Consider factors such as weight capacity, durability, and aesthetic preference.
- Design: Sketch out a detailed design, considering features like the bed frame structure, ladder placement, and any additional storage or workspace elements you wish to include.
- Safety: Prioritize safety by incorporating sturdy handrails and guardrails to prevent falls. Ensure the ladder is securely attached and provides a safe ascent and descent.
Step 2: Gathering Materials and Tools
Once you have a clear plan, gather the necessary materials and tools for the construction process. This may include:
- Timber: Depending on your design, you'll need lumber for bed frame construction, including beams, posts, slats, and support structures. Purchase pre-cut pieces if desired for ease of assembly.
- Hardware: Securely fasten the bed frame using high-quality screws, bolts, nuts, and washers.
- Lumber: Use lumber according to the design to build the ladder, handrails, and guardrails. Consider wood types, dimensions, and construction techniques.
- Fasteners: Securely attach the ladder, handrails, and guardrails using screws, bolts, nuts, and other appropriate fasteners.
- Finishing Supplies: Choose paints or stains to enhance the aesthetics of the loft bed. Consider primers and sealants for added protection.
- Power Tools: A drill, saw, sander, and other power tools will greatly expedite the construction process.
- Measuring Tools: A tape measure, level, and square are essential for accurate measurements and precise assembly.
Step 3: Construction Process
With the materials and tools ready, follow these steps to construct your queen-size loft bed:
- Build the Bed Frame: Assemble the bed frame following your design. Cut and join the beams, posts, and slats using appropriate construction techniques. Securely fasten them using screws, bolts, or other suitable fasteners.
- Construct the Ladder: Create the ladder according to your design. Use lumber to build the rungs and side rails. Secure connections using screws, bolts, or dowels. Make sure the ladder is the right height for safe access to the bed.
- Install the Ladder: Attach the ladder securely to the bed frame, ensuring it is positioned at a safe and convenient location. Use sturdy brackets or supports to attach the ladder.
- Add Handrails and Guardrails: Install handrails and guardrails around the perimeter of the bed platform. This will help protect users from falls. Use wood or metal depending on the design. Install with sufficient fasteners to ensure it can support a person's weight.
- Finishing Touches: Sand the loft bed to smooth any rough edges. Apply a protective sealant and stain or paint it according to your preferred aesthetic.
Step 4: Placement and Installation
The final stage involves positioning and installing the finished loft bed in your bedroom. Ensure the location provides sufficient headroom and allows for comfortable movement around the bed.
- Consider Placement: Choose a location that allows for easy access to the bed and minimizes potential hazards. The location should be close to an electrical outlet for lights or other electronic devices.
- Securely Install: Firmly secure the bed frame to the wall or floor using appropriate anchors and brackets. This will enhance stability and safety.
Step 5: Enjoy Your New Loft Bed
Once the loft bed is fully assembled and installed, enjoy the added space and functionality it brings to your bedroom. Place a queen-size mattress on the platform to create a comfortable sleeping area. Decorate the space with your favorite bedding, pillows, and accessories.
Building a queen-size loft bed can be a rewarding endeavor, allowing you to customize your bedroom space to your specific needs. By following these steps, you can create a unique and functional piece of furniture that enhances both aesthetics and functionality.

How To Build An Easy Diy Queen Size Loft Bed For S Thediyplan

How To Build A Diy Queen Size Loft Bed With Desk Thediyplan

How To Build An Easy Diy Queen Size Loft Bed For S Thediyplan

Free Diy Furniture Plans How To Build A Queen Sized Low Loft Bunk Bed The Design Confidential

Loft Bed Build Diy 120 Dollars Queen Size

How To Build A Loft Bed Free Plans Joinery Design Co

Diy Queen Loft Bed Frame Plans Rannels Rustic Log Build A Beds

Queen Loft Bed Plans Palmetto Bunk

How To Build A Diy Queen Size Loft Bed With Desk Thediyplan
:max_bytes(150000):strip_icc()/camp-loft-bed-58f6450a3df78ca159f3fc8f.jpg?strip=all)
14 Free Diy Loft Bed Plans For Kids And S
