How to Make a Homemade Wooden Bed Frame
Building a wooden bed frame is a rewarding project that allows for customization and can save you money compared to purchasing a pre-made frame. With basic woodworking skills and the right tools, you can create a sturdy and stylish bed that complements your bedroom decor. This guide outlines the steps involved in constructing a homemade wooden bed frame.
1. Design and Planning
Before starting, it's crucial to carefully plan your bed frame's design. Consider these factors:
- Size: Determine the desired length, width, and height of the bed frame to accommodate your mattress and personal preferences.
- Style: Choose a style that aligns with your bedroom's aesthetic. Popular options include platform beds, slatted bases, and headboards.
- Materials: Select suitable wood species based on durability, aesthetics, and budget. Popular choices include pine, oak, maple, and cherry.
- Construction: Decide on the construction method, such as using mortise and tenon joints, pocket holes, or simple butt joints.
- Finish: Consider staining, painting, or leaving the wood natural to match your decor.
Once you've finalized your design, create detailed sketches or drawings with measurements to guide the construction process. This step ensures accuracy and helps avoid mistakes during the build.
2. Gathering Materials and Tools
Before you begin, gather all the necessary materials and tools. The following list provides a general overview, and specific items may vary depending on your design and construction method:
- Wood: Determine the required lengths and thicknesses of wood based on your design.
- Fasteners: Choose appropriate fasteners such as screws, nails, or dowels for assembling the frame.
- Wood glue: Use a high-quality wood glue for strong and lasting joints.
- Sandpaper: Use various grits of sandpaper to smooth the wood surface for a polished finish.
- Finishing materials: Choose stain, paint, or a sealant based your preference.
- Saw: A circular saw or table saw is ideal for cutting wood to precise lengths.
- Drill: A cordless drill with various drill bits is essential for drilling pilot holes and securing screws.
- Screwdriver: A screwdriver or impact driver is helpful for fastening screws.
- Clamps: Use clamps hold wood pieces together while gluing and securing them.
- Tape measure and pencil: Measure and mark wood pieces accurately before cutting.
- Level: Ensure the bed frame is level for stability and evenness.
- Safety glasses and gloves: Protect your eyes and hands while working with power tools and sharp edges.
Ensure you have a safe working environment and follow appropriate safety precautions throughout the project.
3. Cutting and Assembling the Frame
With all the materials and tools gathered, begin the construction process by cutting the wood pieces to the required lengths using your saw. Mark the wood accurately and follow your design plans for precise cuts. After cutting all the pieces, proceed to assemble the frame according to your chosen construction method:
- Mortise and Tenon Joints: These joints offer strength and stability. Using chisels and a mallet, create mortises and tenons on the wood pieces.
- Pocket Holes: This method uses a jig to create angled holes for screws, allowing for a strong and concealed joint.
- Butt Joints: These simple joints connect wood pieces directly, often reinforced with glue and screws.
Apply wood glue to the joints, clamp the pieces together, and secure the joints with screws or dowels as needed. Ensure the joints are strong and aligned before removing the clamps.
4. Adding the Headboard and Footboard
If your chosen design includes a headboard and footboard, attach them securely to the frame using your preferred method. Use mortise and tenon joints, pocket holes, or butt joints reinforced with screws and glue for sturdy connections. Ensure the headboard and footboard are aligned with the frame and level before permanently attaching them.
Once the headboard and footboard are attached, consider adding decorative elements like trim or moldings to enhance the aesthetic appeal of your bed frame.
5. Finishing
After assembling the frame, it's time to finish the wood. Sand all surfaces thoroughly, starting with a coarse grit and gradually moving to finer grits for a smooth finish. Apply stain, paint, or sealant according to your preference. Allow the finish to dry completely before placing your mattress on the bed frame.
Remember to follow the manufacturer's instructions for the specific finish products you are using.

Diy Bed Frame Wood Headboard 1500 Look For 200 A Piece Of Rainbow

Diy Bed Frame Wood Headboard 1500 Look For 200 A Piece Of Rainbow

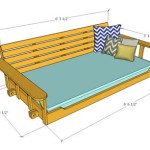
Diy Bed Frame Plans How To Make A With Pete

Diy Bed Frame Angela Marie Made

Diy Bed Frame Wood Headboard 1500 Look For 200 A Piece Of Rainbow

Diy Stained Wood Raised Platform Bed Frame Part 1 Addicted 2 Decorating

How To Make A Wood Bed Frame The Space Between

Easy Diy Platform Bed Frame For A King With Instructions

Diy Bed Frame Wood Headboard 1500 Look For 200 Plans Easy

How To Make A Wood Bed Frame The Space Between