How to Make a Headboard for a Full-Size Bed
Adding a headboard to a full-size bed can elevate the look of a bedroom, providing a focal point and enhancing the overall aesthetic. Creating a headboard from scratch allows for personal customization, enabling you to tailor the design to your specific preferences and existing décor. This guide outlines the essential steps involved in constructing a headboard for a full-size bed, providing a comprehensive understanding of the process.
Choosing Materials and Design
The first step in crafting a headboard is selecting suitable materials and determining the desired design. The chosen materials will largely influence the aesthetic and durability of the headboard. Popular options include wood, upholstered fabric, metal, or a combination of these materials. Wood offers a classic and timeless appeal, while upholstered fabric provides a soft and luxurious touch. Metal headboards can create a modern and industrial feel.
The design of the headboard is equally important. Consider the style of the bedroom, the existing furniture, and personal preferences when making this decision. A simple rectangular headboard can be a versatile choice, while more intricate designs, such as curved or patterned headboards, can provide greater visual impact. Additionally, consider the height of the headboard. A tall headboard can create a sense of grandeur, while a low headboard can provide a more minimalist look.
Measuring and Cutting Materials
Once the materials and design have been chosen, it's crucial to measure and cut the materials accurately. The standard width of a full-size bed is 54 inches, but it's advisable to add a few inches to the width of the headboard to ensure a comfortable fit and prevent any overhang issues. The height of the headboard is a matter of personal preference, but it's essential to consider the overall proportions of the bedroom and the bed frame.
If using wood, use a saw to cut the pieces to the desired size. Ensure that the cuts are precise and that the edges are smooth. For upholstered headboards, measure and cut the fabric according to the dimensions of the headboard frame. Leave additional fabric on the edges for seams and attachments.
Assembling the Headboard Frame
The next step involves assembling the headboard frame. This step can vary depending on the chosen design. For a basic rectangular headboard, start by constructing a rectangular frame using wooden planks or metal piping. Secure the corners with screws, nails, or welding techniques, depending on the materials used. For more complex designs, refer to specific instructions or blueprints provided by the chosen design.
If utilizing an upholstered design, create a separate frame for the headboard's padding. This frame can be made from wood or metal and should be slightly smaller than the main headboard frame to accommodate the padding and fabric. Attach the padding to this inner frame using staples or glue, and then wrap the fabric around the entire frame, securing it with staples or upholstery tacks.
Adding Finishing Touches
Once the headboard frame is assembled, it's time to add finishing touches. This may include sanding, painting, staining, or attaching decorative elements. For wooden headboards, sanding the surface smooth ensures a clean finish and prevents splinters. You can then apply a stain to enhance the natural wood grain or paint the headboard in a color that complements the bedroom décor.
For upholstered headboards, attach buttons or studs for added visual appeal. These decorative elements can be placed in a symmetrical pattern or haphazardly for a more rustic look. Add a layer of fabric to the back of the headboard for a polished and finished appearance. Ensure that all edges are properly finished and secured to prevent fraying.
Attaching the Headboard to the Bed Frame
The final step is to attach the headboard to the bed frame. This process will depend on the design of the headboard and the bed frame. For traditional bed frames, the headboard is usually attached using brackets or bolts that are mounted to the back of the headboard and the bed frame. Newer bed frames may have built-in mechanisms for attaching headboards.
Ensure that the headboard is securely attached to the bed frame before using the bed. It's essential to test the stability of the headboard to prevent any potential accidents. If using heavy materials, reinforce the attachment points for added security.

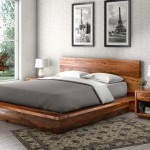
Diy Bed Frame Wood Headboard 1500 Look For 200 A Piece Of Rainbow

50 Best Diy Headboard Ideas Upcycled

Diy Bed Frame Wood Headboard 1500 Look For 200 A Piece Of Rainbow

Diy Upholstered Wingback Headboard Handmade Weekly

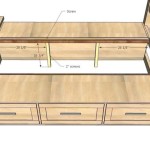
Diy Full Or Queen Size Storage Bed Shanty 2 Chic

Diy Upholstered Headboard Anyone Can Make Somewhat Simple

Diy Bed Frame Wood Headboard 1500 Look For 200 A Piece Of Rainbow

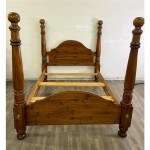
15 Diy Headboard Ideas How To Make A

Here S How To Make A Full Size Headboard Fit Queen Bed
:max_bytes(150000):strip_icc()/diy-59f21039054ad90010815556.jpg?strip=all "14 Diy Wood Headboards")
14 Diy Wood Headboards