How to Build a Wooden Queen Size Bed Frame
Building a wooden queen size bed frame is a great way to add a unique and stylish touch to your bedroom. It's also a relatively simple project that can be completed in a few hours with the right materials and tools. Here's a step-by-step guide to help you get started:
Materials:
- 4 pine 2x6s, 8 feet long
- 2 pine 2x4s, 8 feet long
- 1 pine 1x12, 8 feet long
- 1 sheet of 3/4-inch plywood, 4 feet by 8 feet
- Wood screws
- Wood glue
- Sandpaper
- Finish of your choice (paint, stain, etc.)
Tools:
- Circular saw
- Drill
- Countersink bit
- Clamps
- Measuring tape
- Level
- Hammer
- Nail gun (optional)
Instructions:
Cut the side rails
Cut two 2x6s to 8 feet long for the side rails. These will form the length of the bed frame.
Cut the headboard and footboard
Cut two 2x6s to 6 feet long for the headboard and footboard. These will form the height of the bed frame.
Assemble the side rails
Place the two side rails parallel to each other, 6 feet apart. Clamp them together and drill two pilot holes through both rails, 12 inches from each end. Countersink the holes and drive in two wood screws.
Attach the headboard and footboard
Place the headboard and footboard on top of the side rails, flush with the ends. Clamp them in place and drill two pilot holes through each joint, 12 inches from the top and bottom. Countersink the holes and drive in two wood screws.
Cut and attach the slats
Cut the 1x12 into six slats, each 72 inches long. Place the slats evenly spaced across the side rails and clamp them in place. Drill two pilot holes through each slat, 6 inches from each end. Countersink the holes and drive in two wood screws.
Attach the plywood
Place the plywood on top of the slats and clamp it in place. Drill two pilot holes through the plywood into each slat, 12 inches apart. Countersink the holes and drive in two wood screws.
Sand and finish
Sand the entire bed frame to remove any rough edges. Apply the finish of your choice, such as paint, stain, or polyurethane.
Once the finish is dry, your wooden queen size bed frame is complete! Enjoy your new custom-made piece of furniture.

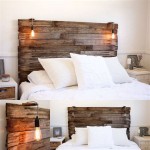
Diy Bed Frame Wood Headboard 1500 Look For 200 A Piece Of Rainbow

Diy Bed Frame Wood Headboard 1500 Look For 200 A Piece Of Rainbow

Plans Queen Size Bed Plan Project Small Wood Projects From Scrap Frame Diy

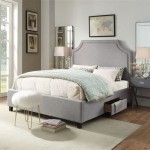
Diy Full Or Queen Size Storage Bed Shanty 2 Chic

Diy Bed Frame Plans How To Make A With Pete

Diy Bed Frame Wood Headboard 1500 Look For 200 A Piece Of Rainbow

How To Build A Modern Platform Bed For 125 Diy Beautify Creating Beauty At Home

Essential Platform Bed Frame Ana White

How To Make A Bed Frame With Plans Available

Queen X Barn Door Farmhouse Bed Plan Her Tool Belt