How to Build a Simple Twin Bed Frame
Constructing a twin bed frame is a rewarding DIY project that can enhance your bedroom's aesthetic and save you money. With the right materials, tools, and instructions, you can create a sturdy and stylish bed frame that complements your decor. Follow this guide to learn the steps involved in building a simple twin bed frame.
Choosing Your Materials
The first step in building your bed frame is to gather the necessary materials. The specific materials you'll need will depend on the design you choose, but some common components include:
- Wood: Pine, cedar, or oak are good choices for bed frames due to their strength and affordability. You can select pre-cut lumber or purchase larger pieces and cut them to size.
- Wood screws: Use screws that are long enough to securely fasten the wood pieces together.
- Wood glue: Applying wood glue before screwing the pieces together will add extra strength to your bed frame.
- Slats: Slats are essential for supporting the mattress. You can use pre-made slats or cut your own from wooden boards.
- Finish: Choose a finish that complements your bedroom decor. You can use paint, stain, or sealant to protect the wood.
It's important to purchase high-quality materials to ensure the durability and longevity of your bed frame. Before purchasing your lumber, check for any cracks, knots, or imperfections that could compromise the strength of your project.
Building the Frame
Once you've gathered your materials, you can begin constructing the bed frame. The following steps outline the process for a simple twin bed frame with a headboard and footboard:
- Cut the wood: Cut the wood planks to the desired lengths for the headboard, footboard, and side rails. Remember to factor in the thickness of the wood when calculating the lengths.
- Assemble the headboard and footboard: Attach the vertical and horizontal pieces of the headboard and footboard, using wood glue and screws to create a sturdy structure. You can add decorative elements to the headboard and footboard to enhance their appearance.
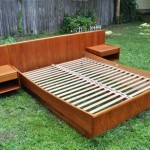
- Construct the side rails: Join two long pieces of wood together for each side rail using screws and wood glue. Make sure the rails are wide enough to accommodate the slats.
- Attach the side rails to the headboard and footboard: Align the side rails with the headboard and footboard and secure them with screws and wood glue. Ensure that the side rails are parallel and at the same height.
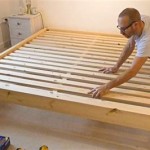
- Install the slats: Place the slats across the width of the bed frame, carefully aligning them with the side rails. You can use wood glue and small screws to secure the slats to the side rails.
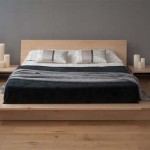
- Finish the bed frame: Apply your chosen finish to the bed frame, allowing each coat to dry completely before applying the next. You can add an extra layer of sealant to protect the wood from wear and tear.
Final Touches
After the bed frame is completely assembled and finished, you can add some final touches. You can consider:
- Adding a mattress support: A center support beam placed between the side rails can help prevent the mattress from sagging over time.
- Attaching decorative elements: You can enhance the appearance of your bed frame by adding moldings, carving, or other decorative details.
- Accessorizing your bed: Once your bed frame is complete, you can add accessories like a headboard, footboard, or bed skirt to complete the look.
Building a twin bed frame is a rewarding DIY project that allows you to customize your bedroom's aesthetic. By following these steps and using high-quality materials, you can create a sturdy and stylish bed frame that will last for years to come.

Diy Twin Platform Bed

Simple Bed Twin Size Ana White

Easy Diy Twin Platform Bed Frame Tutorial Domestic

Diy Twin Platform Bed

Easy Diy Wood Twin Bed Frame With Metal Legs

Diy Modern Twin Bed Kreg Tool

How To Build A Twin Size House Bed Addicted 2 Diy

This Minimal House Diy Minimalism Home Improvement

Diy Modern Twin Bed The Awesome Orange

Diy Twin Bed Build For Under 150 With My Daughter Simple Rustic