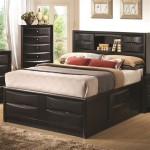
How to Build a Queen-Size Platform Bed Frame with Drawers
Introduction: Building a platform bed frame with drawers is a great way to add extra storage to your bedroom while also creating a stylish and sturdy piece of furniture. This step-by-step guide will provide you with all the information you need to build your own queen-size platform bed frame with drawers.
Materials:
- 8-foot 2x6 pine boards (4)
- 8-foot 2x4 pine boards (2)
- 8-foot 1x12 pine boards (2)
- 4-foot 1x8 pine board (1)
- 1-inch wood screws
- 2-inch wood screws
- 3-inch wood screws
- Wood glue
- Sandpaper
- Plywood or MDF for the drawer bottoms (optional)
- Drawer slides (optional)
- Handles or knobs for the drawers (optional)
Tools:
- Circular saw or miter saw
- Drill
- Countersink bit
- Clamps
- Level
- Measuring tape
- Hammer or nail gun
Step 1: Cut the Lumber
Begin by cutting the lumber according to the following dimensions:
- 2x6 legs: 4 pieces at 59 inches
- 2x4 side rails: 2 pieces at 75 inches
- 1x12 headboard and footboard: 2 pieces at 60 inches
- 1x8 drawer fronts: 4 pieces at 18 inches
Step 2: Assemble the Frame
Assemble the frame by attaching the side rails to the legs using 2-inch wood screws. Make sure to use two screws per joint and countersink the screws flush with the surface of the wood.
Attach the headboard and footboard to the legs using 3-inch wood screws. Again, use two screws per joint and countersink the screws.
Step 3: Build the Drawers (Optional)
If you are adding drawers to your bed frame, you will need to build them now. You can use plywood or MDF for the drawer bottoms, and you can either purchase drawer slides or make your own using scrap wood.
To build a drawer, cut two pieces of plywood or MDF to the desired size for the bottom. Cut four pieces of 1x4 pine to the desired height of the drawer sides, and two pieces to the desired length of the drawer front and back.
Assemble the drawer by gluing and screwing the sides to the bottom, then attaching the front and back pieces.
Step 4: Install the Drawer Slides (Optional)
If you are using drawer slides, install them now by following the manufacturer's instructions.
Step 5: Attach the Drawer Fronts
Attach the drawer fronts to the drawers using 1-inch wood screws. Center the drawer fronts on the drawers and countersink the screws.
Step 6: Sand and Finish
Sand the entire bed frame and drawers to smooth out any rough edges. You can then apply a stain or paint of your choice to the bed frame.
Step 7: Enjoy!
Your new queen-size platform bed frame with drawers is now complete! Enjoy the extra storage space and the stylish new look of your bedroom.

Queen Size Platform Bed Frame With Storage Drawers Sawdust Girl

Diy Queen Bed Frame With Storage Plans Wilker Do S

Diy Full Or Queen Size Storage Bed Shanty 2 Chic

Brandy Scrap Wood Storage Bed With Drawers Queen Ana White

Diy Queen Storage Bed W Drawers

How To Build A Queen Size Storage Bed Addicted 2 Diy

Platform Bed With Drawers Frame Diy

Queen Size Platform Bed Frame With Storage Drawers Sawdust Girl

Diy Platform Bed With Storage Modern Builds

Diy Platform Bed With Storage
Related Posts