How to Build a Queen Size Floating Platform Bed
A floating platform bed, with its minimalist design and sleek appearance, offers a modern and stylish addition to any bedroom. Its unique construction, where the bed frame seemingly floats above the floor, creates an illusion of spaciousness and airiness. Building your own queen-size floating platform bed can be a fulfilling DIY project, allowing you to personalize the design and create a bespoke piece that perfectly suits your needs and preferences. This guide will walk you through the essential steps involved in building your own floating platform bed, ensuring you can achieve a stunning and functional bedroom centerpiece.
Step 1: Gather Materials and Tools
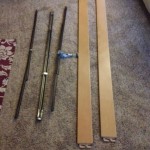
Before embarking on your project, it’s crucial to gather all the necessary materials and tools. This will ensure a smooth and efficient construction process. Here's a comprehensive list of materials you will need:
- Lumber: 2x12s for the platform, 2x4s for the frame, and 1x4s for the headboard and footboard (adjust the dimensions based on your design)
- Wood screws: Various sizes for attaching the frame, platform, and headboard/footboard
- Wood glue: For added strength in the construction
- Queen-size mattress: Ensure it fits the platform dimensions
- Finishing materials: Stain, paint, or varnish
- Optional: Storage drawers, LED lights, or other decorative elements
In addition to the materials, you'll need the following tools:
- Measuring tape and pencil: For marking and ensuring accurate dimensions
- Circular saw or miter saw: For precise cutting of lumber
- Drill and drill bits: For creating pilot holes and driving screws
- Screwdriver: For tightening screws
- Level: To ensure the platform is level
- Safety glasses and gloves: For protection during construction
Step 2: Building the Framework
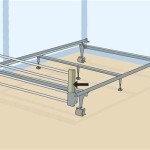
The foundation of your floating platform bed is the robust framework, which will provide structural stability and support for the mattress. Begin by constructing the perimeter frame of the bed using the 2x4s. Here's a detailed breakdown of the process:
- Cut the side rails: Measure the desired length of your bed and subtract the width of your mattress. Cut two 2x4s to these dimensions for the side rails.
- Cut the head and footboard rails: Measure the width of your mattress and add the desired height of your headboard and footboard. Cut two more 2x4s to these dimensions for the headboard and footboard rails.
- Assemble the frame: Place the side rails parallel to each other at the desired distance. Use wood glue and screws to attach the headboard and footboard rails to the ends of the side rails, creating a rectangular perimeter frame.
- Add support beams: Install additional 2x4s across the width of the frame, creating support beams for the platform. These beams should be spaced evenly across the length of the bed, ensuring proper weight distribution.
- Check for level: Use a level to verify that the frame is completely level before moving on to the next step.
Step 3: Constructing the Platform
Now, you will build the platform that will directly support your mattress. The platform can be made from a single sheet of plywood or multiple pieces of lumber, based on your preference and the desired look of your bed.
- Cut the platform pieces: Measure the interior dimensions of the perimeter frame and cut the plywood or lumber into the required sizes.
- Attach the platform to the frame: Place the platform pieces on top of the support beams and attach them securely using screws. Ensure the platform is evenly positioned and level.
- Consider storage options: If desired, you can incorporate storage solutions within the platform. This can involve adding drawers to the underside or creating a lift-up platform with storage space beneath.
Step 4: Building the Headboard and Footboard
The headboard and footboard add visual appeal and style to the floating platform bed. You can create a simple design with 1x4s or go for a more elaborate look using decorative molding or upholstery.
- Determine the size and style: Decide on the desired height and design of the headboard and footboard. You can consider a simple, rectangular shape or incorporate curves or decorative elements.
- Cut the pieces: Measure the required dimensions and cut the 1x4s or other materials for the headboard and footboard.
- Assemble the pieces: Attach the individual pieces of wood to form the desired shape of the headboard and footboard. Use wood glue and screws for a strong and secure bond.
- Attach the headboard and footboard to the frame: Carefully position the headboard and footboard against the frame and secure them using screws or brackets. Ensure they are aligned and level.
Step 5: Finishing Touches
With the construction complete, it's time to add the finishing touches to your floating platform bed. This involves sanding, staining, painting, or varnishing the wood to achieve the desired look. You can also add decorative elements, such as LED lights or upholstery, to further personalize the bed.
- Sand the surfaces: Use sandpaper to smooth out any rough edges and create a consistent surface for the finishing process.
- Apply stain, paint, or varnish: Based on your preference, apply the desired finish to the bed. Ensure the finish is applied evenly and according to the manufacturer's instructions.
- Add decorative elements: If you wish, incorporate LED lights, upholstery, or other decorative elements to enhance the design and functionality of your bed.
Building your own queen-size floating platform bed can be a challenging yet rewarding endeavor. By carefully following these steps, you can create a stylish and functional bed that will serve as the focal point of your bedroom. Remember to prioritize safety and seek assistance if needed. With patience and precision, you can create a beautiful and unique piece of furniture that reflects your personal style and enhances your bedroom's aesthetic appeal.

Queen Size Diy Floating Bed Frame

Diy Queen Size Floating Bed Howtospecialist How To Build Step By Plans Frame

Floating Queen Size Platform Bed Plans Howtospecialist How To Build Step By Diy Frame

Diy Queen Size Floating Bed Howtospecialist How To Build Step By Plans

How To Build A Diy Floating Bed For Queen Size Mattress Thediyplan

Floating Queen Size Platform Bed Plans Howtospecialist How To Build Step By Diy Frame

How To Build A Diy Floating Bed For Queen Size Mattress Thediyplan

Queen Size Floating Bed Plans

Queen Size Floating Bed Plans

Queen Diy Platform Bed With Floating Night Stands