How to Build a Queen Size Bed Headboard
A headboard can instantly elevate the look and feel of your bedroom. It adds a touch of sophistication, provides visual interest, and even serves as a practical place for reading or relaxing. While you can purchase pre-made headboards, building your own allows for greater customization and can be a rewarding DIY project. This article outlines the steps involved in creating a queen-sized headboard, guiding you through the process from choosing materials to finishing touches.
1. Planning and Preparation
Before embarking on the construction, it's essential to plan carefully and gather the necessary materials. Start by determining the desired size, style, and materials for your headboard.
Measure the width of your queen-size bed, ensuring the headboard is slightly wider to provide a seamless fit. Decide on the desired height. Consider the overall aesthetics of your bedroom and whether you want a tall, statement piece or a more subtle, minimalist design.
Select the materials for your headboard. Wood is a popular choice for its durability and versatility, offering various species and finishes. Consider using plywood for the base and applying decorative elements like molding or trim for visual appeal. Alternatively, fabric-upholstered headboards can add a touch of softness and texture to the bedroom.
Once the design and materials are finalized, create a sketch or blueprint to visualize the structure. This will help in estimating the required materials and ensuring a cohesive final product.
2. Building the Frame
Constructing the frame serves as the foundation for the headboard. This step involves cutting and assembling the wood components to create the desired shape.
Using a saw, cut the wood panels to the required dimensions. Ensure all cuts are precise and at right angles for a stable and aesthetically pleasing frame. You may find it helpful to use a miter saw for clean, angled cuts, especially when working with decorative molding.
Once the wood panels are cut, join them using wood glue and screws for a secure and durable connection. Ensure the screws are long enough to penetrate through both panels and into the underlying structure. Use a drill with a pilot bit to prevent the wood from splitting during screw insertion.
Reinforce the frame with additional support pieces as needed, particularly if you are constructing a tall or elaborate headboard. This will improve its stability and prevent sagging over time.
3. Adding Decorative Elements
With the frame complete, personalize your headboard by adding decorative elements. This can involve incorporating molding, trim, or other embellishments to enhance its visual appeal.
Measure and cut decorative molding to the desired length and shape. Use wood glue and nails or staples to secure the molding to the frame. Be sure to align the molding pieces precisely and ensure the joints are tight and flush.
If you are using trim or other decorative elements, attach them to the frame in a similar fashion, ensuring proper alignment and secure fastening. You can experiment with different patterns and designs to achieve the desired aesthetic.
Consider using a router to create decorative edges or details on the headboard. This can enhance its visual appeal and add a personalized touch.
4. Finishing Touches
After building the headboard, apply finishing touches to complete the project. This step involves sanding, painting, or staining the wood to achieve the desired look and protect the surface.
Sand the headboard thoroughly using progressively finer grits of sandpaper to smooth out any rough edges or inconsistencies. This will prepare the surface for painting or staining and create a smooth, uniform finish.
If painting, choose a paint that complements the bedroom's color scheme and style. Apply multiple thin coats for optimal coverage and allow each coat to dry thoroughly before applying the next.
If staining, select a stain color that enhances the wood's natural beauty. Apply the stain evenly using a brush or cloth and wipe away any excess. Allow the stain to dry completely before applying a protective sealant for durability.
Once the finishing touches are complete, consider adding hardware like headboard brackets or mounting plates for secure attachment to the bed frame.

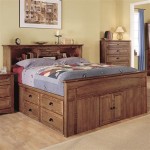
Diy Bed Frame Wood Headboard 1500 Look For 200 A Piece Of Rainbow

Easy Build Wood Headboard All Mattress Sizes Ana White

Diy Bed Frame Wood Headboard 1500 Look For 200 A Piece Of Rainbow

Diy Bed Frame Wood Headboard 1500 Look For 200 A Piece Of Rainbow

Queen X Barn Door Farmhouse Bed Plan Her Tool Belt

The Building Of A Bed Queen Frame Plans

How To Build A Diy Simple Queen Headboard Wilker Do S

Diy Bed Frame Wood Headboard 1500 Look For 200 A Piece Of Rainbow

How To Upholster A Headboard For Beginners

Diy Upholstered Wingback Headboard Handmade Weekly