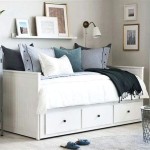
How to Build a Queen-Size Bed Frame with Headboard and Storage
Building a queen-size bed frame with a headboard and storage is an excellent project for anyone looking to add style, functionality, and extra space to their bedroom. By following these step-by-step instructions, you can create a custom bed frame that meets your specific needs.
Materials:
- Pine or oak lumber (1x6, 1x8, 1x10)
- Plywood or MDF (1/2 inch thick)
- Wood screws (2-inch, 1-1/2 inch, 1 inch)
- Wood glue
- Brad nails
- Stain or paint (optional)
- Headboard fabric (optional)
- Foam padding (optional)
- Handles (for storage drawers)
Tools:
- Circular saw or miter saw
- Drill
- Countersink bit
- Brad nailer
- Sander
- Clamps
- Carpenter's square
Instructions:
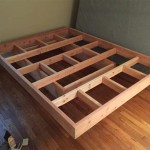
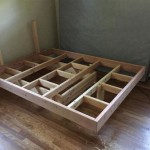
1. Cut the Lumber:
Cut the lumber according to the following dimensions:
- Legs: four pieces, 54 inches long
- Side rails: two pieces, 80 inches long
- Headboard support: one piece, 60 inches long
- Headboard top: one piece, 60 inches long
- Headboard bottom: one piece, 54 inches long
- Drawer sides: four pieces, 36 inches long
- Drawer fronts: two pieces, 18 inches long
- Drawer bottoms: two pieces of plywood, 18x36 inches
2. Assemble the Side Rails:
Attach the legs to the side rails using 2-inch screws and wood glue. Make sure the legs are flush with the end of the rails and square to the ground. Reinforce the joints with corner braces or L-brackets.
3. Install the Headboard Support:
Attach the headboard support to the inside of the side rails, 10 inches from the top. Use 1-1/2 inch screws and wood glue. Ensure the support is level and parallel to the top edge of the rails.
4. Create the Headboard:
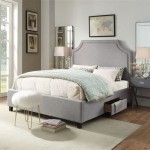
Attach the headboard top to the headboard support using 1-inch screws. Center the headboard top on the support and ensure it is flush with the outside edge of the side rails. Attach the headboard bottom to the bottom of the side rails, also using 1-inch screws. If desired, upholster the headboard with fabric and foam padding.
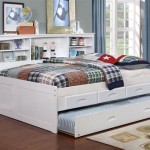
5. Build the Storage Drawers (Optional):
Assemble the drawer boxes by attaching the sides to the fronts and backs using 1-1/2 inch screws. Install the drawer bottoms using brad nails. Attach handles to the drawer fronts.
6. Attach the Headboard and Drawers:
Place the headboard on top of the side rails and secure it with 1-1/2 inch screws. Slide the storage drawers into the space under the bed frame.
7. Finishing Touches:
Sand the bed frame and headboard to smooth any rough edges. Stain or paint the frame as desired. Add a mattress and enjoy your new custom-built bed frame with headboard and storage.
Tips:
- Use a pocket hole jig for stronger joints.
- Pre-drill holes for screws to prevent splitting.
- Countersink screws below the surface of the wood for a cleaner finish.
- Reinforce all joints with wood glue and clamps.
- Add decorative molding or trim to the headboard for a more elegant look.

Diy Full Or Queen Size Storage Bed Shanty 2 Chic

How To Build A Queen Size Storage Bed Addicted 2 Diy

Queen Size Platform Bed Frame With Storage Drawers Sawdust Girl

Diy Storage Bed Printable Woodworking Plans And Tutorial

Queen X Barn Door Farmhouse Bed Plan Her Tool Belt

Diy Bed Frame Wood Headboard 1500 Look For 200 A Piece Of Rainbow

Queen X Barn Door Farmhouse Bed Plan Her Tool Belt

Diy Bed Frame Wood Headboard 1500 Look For 200 A Piece Of Rainbow

Diy Storage Bed Projects The Budget Decorator

Platform Bed Frame Plans Howtospecialist How To Build Step By Diy