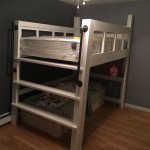
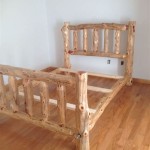
How to Build a Queen Size Bed Frame: A Comprehensive Guide for DIY Enthusiasts
Creating a custom queen size bed frame is a satisfying project that adds a touch of personalization to your bedroom. With careful planning and a few basic tools, you can build a sturdy and stylish bed frame that will elevate your sleep experience. Here's a comprehensive guide to guide you through the essential steps involved in building a queen size bed frame:
Materials and Tools
- 8' (244cm) 2x6 lumber (4 pieces)
- 6' (183cm) 2x6 lumber (2 pieces)
- 8', 10' and 12' (244cm, 305cm and 366cm) 1x6 lumber (for side rails, headboard, and footboard)
- Wood screws (3" and 2 1/2")
- Wood glue
- Clamps
- Miter saw
- Circular saw
- Drill
- Countersink bit
- Sandpaper or orbital sander
- Finish (paint, stain, or polyurethane)
Step 1: Cut the Main Frame
Begin by cutting the 2x6 lumber for the main frame. The two side rails should be 8' long, while the headboard and footboard should be 6' long. Assemble the main frame by attaching the side rails to the headboard and footboard using 3" wood screws and wood glue. Reinforce the corners with angle brackets for added strength.
Step 2: Build the Side Rails
Create the side rails by attaching 1x6 lumber to the inside of the main frame. Cut the 1x6 lumber to 8' long and attach them flush with the top of the side rails. Use 2 1/2" wood screws and wood glue to secure them. Reinforce the joints with corner clamps to ensure a tight fit.
Step 3: Construct the Headboard and Footboard
Design the headboard and footboard based on your desired style. Cut the 1x6 lumber to the desired length and assemble the panels using wood glue and brad nails. You can create a simple rectangular shape or add decorative details such as panels or trim.
Step 4: Attach the Headboard and Footboard
Attach the headboard to the main frame by aligning it with the side rails. Secure it with 3" wood screws and wood glue. Repeat the process for the footboard, ensuring it is level and flush with the side rails. Reinforce the joints with corner clamps for extra stability.
Step 5: Add Slats for Support
Cut 1x4 lumber to fit the length of the bed frame. Space the slats evenly across the frame and attach them to the side rails using 2 1/2" wood screws. The slats provide support for the mattress and box spring.
Step 6: Sand and Finish
Sand the entire bed frame to remove any splinters or rough edges. Use an orbital sander for a smoother finish. Apply your desired finish to protect and enhance the appearance of the bed frame. You can choose from paint, stain, or polyurethane based on your preferences.
Step 7: Enjoy Your Custom Bed Frame
Once the finish has dried, your queen size bed frame is complete. Place your mattress and box spring on the frame and enjoy a comfortable and stylish night's sleep. The satisfaction of building your own bed frame will add a touch of pride to your bedroom décor.

Diy Bed Frame Wood Headboard 1500 Look For 200 A Piece Of Rainbow

Queen X Barn Door Farmhouse Bed Plan Her Tool Belt

How To Build A Modern Platform Bed For 125 Diy Beautify Creating Beauty At Home

Essential Platform Bed Frame Ana White

Plans Queen Size Bed Plan Project Small Wood Projects From Scrap Frame Diy

How To Build A L Shaped Desk Mid Century Modern Diy Builds

Essential Platform Bed Frame Ana White

Simple Queen Bed Frame Diy Plans

Diy Bed Frame Wood Headboard 1500 Look For 200 A Piece Of Rainbow

Easy To Build Diy Bed Houseful Of Handmade