Building a Murphy Bed: Essential Tips and Free Plans
A Murphy bed is a perfect solution for small spaces or guest rooms, as it can be folded up when not in use to save space. It's a great way to maximize your living space and create a more versatile room.
Building a Murphy bed can be a daunting task, but it's not impossible with the right tools and materials. Here are some essential aspects to consider when embarking on this project:
1. Choose the Right Design
Murphy beds come in various designs, including side-folding, center-folding, and vertical folding models. Each design has its own advantages and disadvantages, so it's important to choose one that suits your specific needs and space constraints.
2. Determine the Bed Size
Consider the size of your room and the desired sleeping area when choosing the bed size. Murphy beds are typically available in twin, full, and queen sizes, but you can also customize the dimensions to fit your space.
3. Gather the Necessary Tools and Materials
Building a Murphy bed requires a variety of tools, including a circular saw, drill, screwdriver, and clamps. You'll also need lumber, plywood, hinges, and other hardware.
4. Prepare the Wall or Closet
Murphy beds are typically mounted to a wall or installed in a closet. You'll need to prepare the mounting surface by ensuring it's strong enough to support the bed and that there are no obstacles in the way.
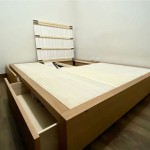
5. Assemble the Frame and Cabinet
The bed frame and cabinet are the core components of a Murphy bed. Follow the plans carefully to cut and assemble the pieces, ensuring that the joints are sturdy and aligned.
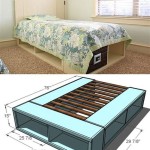
6. Install the Mattress Platform
The mattress platform supports the mattress and allows it to be folded up and down. Ensure the platform is securely attached to the frame and that it moves smoothly when opening and closing the bed.
7. Mount the Hardware
The hinges and other hardware are essential for the operation of the Murphy bed. Install the hardware according to the plans, ensuring that the bed opens and closes effortlessly.
8. Test and Finish
Once the bed is assembled, test its functionality by opening and closing it several times. Make any necessary adjustments to ensure smooth operation. Finally, apply a finish, such as paint or stain, to match your décor.
To assist you in your project, free Murphy bed plans are widely available online, providing detailed instructions and diagrams for different designs. These plans can help you save time and ensure accuracy during the construction process.
Remember, building a Murphy bed requires careful planning, attention to detail, and some basic woodworking skills. By following these essential aspects and utilizing free plans, you can create a functional and space-saving Murphy bed that will enhance your living space.

Free Diy Furniture Plans How To Build A Queen Sized Murphy Bed The Design Confidential

Plans A Murphy Bed You Can Build And Afford To Ana White

Diy Modern Farmhouse Murphy Bed How To Build The Desk Free Plans Addicted 2

Diy Murphy Bed For Under 150 With Plans Your Modern Family

Diy Murphy Bed Tutorial And

Diy Murphy Bed With Free Plans

Free Diy Furniture Plans How To Build A Queen Sized Murphy Bed The Design Confidential

Simple Pull Out Bed And Murphy Beds Well Being

Diy Murphy Bed Tutorial And

How To Build A Murphy Bed That Easily Transforms Into Desk Diy Family Handyman