How To Build A Floating Queen Bed Frame
Before delving into the exhilarating journey of crafting a floating queen bed frame, it is imperative to acknowledge the significance of understanding the essential aspects that govern this endeavor. These fundamental principles lay the groundwork for a successful build, guiding you towards a magnificent floating bed frame that will elevate your sleeping experience.
This comprehensive guide will meticulously delve into the core elements that are pivotal to building a floating queen bed frame, empowering you with the knowledge and techniques necessary to create a masterpiece that will transform your bedroom into an oasis of comfort and style.
1. Selecting the Right Materials
The foundation of any project lies in the materials chosen. For a floating bed frame, the ideal materials are typically sturdy hardwoods such as oak, maple, or birch. These woods offer exceptional strength and durability, ensuring the longevity of your creation.
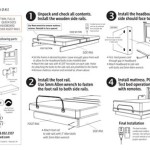
2. Crafting the Side Rails and Headboard
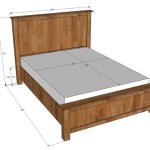
The side rails and headboard form the backbone of your floating bed frame. Precision is key when constructing these components. Carefully cut the side rails to the desired length and join them together using pocket holes or mortise and tenon joints. The headboard can be crafted from a single piece of wood or assembled from multiple pieces for a more intricate design.
3. Installing the Support System
The support system is crucial for ensuring the stability of your floating bed frame. This typically involves installing French cleats or metal brackets to the wall and attaching corresponding cleats or brackets to the back of the side rails. The French cleats will provide a secure and concealed connection, allowing you to adjust the height of your bed frame effortlessly.
4. Finishing Touches and Assembly
Once the main components are in place, you can add the finishing touches. Sandpaper the frame thoroughly and apply a stain or paint to match your decor. Assemble the frame by connecting the side rails to the headboard and securing it to the wall using the support system. Add a mattress and bedding, and your floating queen bed frame is complete, ready to provide you with a blissful night's sleep.
Conclusion
Building a floating queen bed frame is an exciting project that combines creativity with technical expertise. By following these essential aspects meticulously, you can construct a stunning bed frame that will add a touch of elegance and sophistication to your bedroom. The journey of creating your own floating bed frame is not only rewarding but also empowering, allowing you to customize your sleeping space to perfectly suit your needs and desires.

Diy Queen Size Floating Bed Howtospecialist How To Build Step By Plans Frame

How To Build A Diy Floating Bed For Queen Size Mattress Thediyplan

Floating Queen Size Platform Bed Plans Howtospecialist How To Build Step By Diy Frame

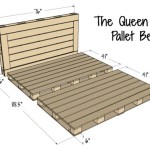
Queen Size Floating Bed Plans

Diy Queen Size Floating Bed Howtospecialist How To Build Step By Plans

Diy Floating Bed Frames How To Design Plan And Build Them From Scratch

Floating Queen Size Platform Bed Plans Howtospecialist How To Build Step By Diy Frame

Queen Diy Platform Bed With Floating Night Stands Frame

King Size Floating Bed Frame Easily Build Your Own

How To Make A Floating Bed Time Lapse