How Do You Make a Murphy Bed Without a Kit?
A Murphy bed, also known as a wall bed, is a space-saving solution that transforms from a bed into a wall-mounted cabinet. While commercial Murphy bed kits offer convenience, building your own allows for customized dimensions, materials, and finishes. This article provides a comprehensive guide to crafting a Murphy bed without relying on a pre-made kit.
1. Planning and Design
Before embarking on construction, meticulous planning is crucial to ensure a successful outcome. This involves determining the bed's size, choosing appropriate materials, and carefully sketching the design.
Size and Dimensions:
The first step is to decide upon the desired size of the bed. Consider the available space, desired sleeping area, and the height of the bed when fully lowered. Carefully measure the intended space in your room to determine the overall dimensions of the Murphy bed.
Materials:
Selecting the right materials is critical for building a sturdy and functional Murphy bed. Common materials include: *Frame:
Wood, such as pine or plywood, is ideal due to its durability and ease of working with. *Hinges:
Robust hinges are essential for smooth and reliable operation. Heavy-duty steel hinges with a minimum of three hinges are recommended. *Support Mechanism:
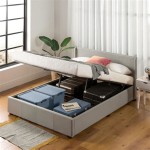
Consider a gas-lift system for easy operation. Alternatively, heavy-duty springs or a manual lift mechanism can be used. *Mattress:
It is advisable to use a standard mattress size that fits the chosen dimensions. *Finishing:
Opt for a durable finish that complements the overall aesthetic of the room. Paint, varnish, or stain can be used depending on personal preference.
Design and Sketching:
Creating a detailed sketch of the Murphy bed is essential for visualizing the construction process. The sketch should illustrate the core elements, including the frame, hinges, support mechanism, and any additional components. It is also helpful to create separate diagrams of each part for clarity.2. Construction Process
Once planning and design are finalized, the construction process can begin. This involves building the frame, installing the hinges, integrating the support mechanism, and incorporating the mattress.
Building the Frame:
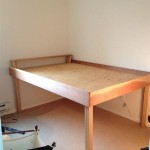
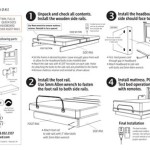
The frame provides the basic structure for the bed. The primary components are the bed frame, the wall-mounted cabinet, and the support structure for the hinges. The bed frame should be strong and solid to support the weight of the mattress and users. The wall-mounted cabinet will house the bed when folded up. The support structure for the hinges must be secure and capable of handling considerable force.
Installing the Hinges:
The hinges are critical for the bed's functionality. They connect the bed frame to the wall-mounted cabinet and allow for smooth folding and unfolding. Ensure that the hinges are securely attached to both the frame and the cabinet. Use a drill and screws to fasten the hinges to the wood.
Support Mechanism:
The support mechanism is responsible for lifting and holding the bed in place. Gas-lift systems are highly recommended as they provide effortless operation. If using a manual lift, ensure that it can safely and effectively support the weight of the bed.
Mattress Integration:
For a seamless fit, select a mattress that corresponds to the bed frame's dimensions. The mattress should be secured to the bed frame to prevent movement during use.3. Finishing and Installation
After construction, finishing touches are crucial for a visually appealing and functional Murphy bed. This includes sanding, painting, or staining the wood to enhance its appearance.
Finishing:
Sanding the wood frame smoothens the surface, creating a suitable base for further finishing. Apply paint, varnish, or stain according to desired aesthetics and the material used.
Installation:
The Murphy bed should be securely mounted to the wall to ensure stability. Using heavy-duty brackets, attach the wall-mounted cabinet to the wall, ensuring it is level.
Testing:
After completing the installation, test the Murphy bed's functionality thoroughly. Ensure the bed can be raised and lowered smoothly without any obstruction. Ensure the bed is stable and secure.Building a Murphy bed without a kit requires careful planning, meticulous construction, and attention to detail. The process can be challenging but ultimately rewarding, offering the satisfaction of crafting a unique and functional piece of furniture.

Diy Murphy Bed For Under 150 With Plans Your Modern Family

Diy Horizontal Murphy Bed Without Kit And Design Inspiration Home Interiors

Diy Murphy Bed Using Old Doors Rustic Crafts

Diy Murphy Bed Without Expensive Hardware

Diy Murphy Bed Tutorial And

Murphy Bed Diy

Diy Murphy Bed Project From A Kit Girl Just

Diy Modern Murphy Bed Huntress

Queen Size Vertical Diy Murphy Bed Hardware And Stay Level Desk Combo Easy

How To Build A Gorgeous Diy Murphy Bed Using Hardware Kit Plans Modern Beds