Free DIY Horizontal Murphy Bed Plans
A Murphy bed, also known as a wall bed, is a space-saving solution that can transform a small room into a multi-functional area. It's a clever way to maximize living space by concealing a bed within a wall unit or cabinet. Whether you're looking to create a cozy guest room, a home office that doubles as a bedroom, or simply want to add a unique touch to your home decor, building a DIY horizontal Murphy bed can be a rewarding project. This article will guide you through the process of constructing a horizontal Murphy bed using free plans, providing detailed steps and tips along the way.
Understanding the Basics of a Horizontal Murphy Bed
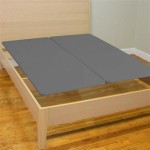
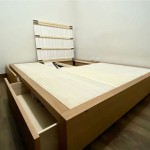
A horizontal Murphy bed differs from the traditional vertical version by having the bed fold down horizontally, typically against a wall. This design is particularly suitable for smaller spaces where vertical clearance is limited, as it maintains a low profile and minimal impact on the room's ceiling height. The basic components of a horizontal Murphy bed include: * **Frame:** The sturdy foundation that supports the bed platform. * **Hinges:** Robust hinges that allow the bed to fold down and up smoothly. * **Support System:** A system of brackets or supports that hold the bed in the upright position. * **Platform:** The bed frame that holds the mattress. * **Storage:** Optional storage compartments integrated into the bed unit for added functionality.
Using Free Plans for Your DIY Murphy Bed
Numerous free DIY plans for horizontal Murphy beds are available online, catering to various skill levels and design preferences. These plans typically provide detailed instructions, diagrams, and cutting lists. Choosing the right plan is crucial, so consider these factors:
- **Materials:** Ensure the plan uses materials you are comfortable working with and that are readily available in your area.
- **Complexity:** Select a plan that aligns with your woodworking skills and available tools.
- **Design:** Choose a design that complements your existing furniture and decor.
Here are some reputable sources for free DIY horizontal Murphy bed plans:
- **Ana White:** A popular woodworking website with a wide range of free plans, including Murphy beds.
- **Instructables:** A community-driven platform featuring user-submitted DIY projects, including Murphy bed plans.
- **Pinterest:** A visual search engine with an abundance of DIY inspiration, including countless Murphy bed plans.
Essential Steps to Building a Horizontal Murphy Bed
Once you have selected a plan and gathered the necessary materials, follow these general steps to construct your horizontal Murphy bed:
1. Prepare the Workspace
Clear a spacious area in your workshop or garage for building the bed. Ensure you have adequate lighting and ventilation.
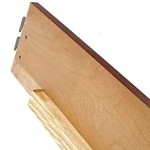
2. Cut and Assemble the Frame
Using your chosen plan as your guide, carefully cut all the wood pieces to the specified dimensions. Assemble the frame using wood glue and screws, reinforcing connections with corner brackets for added stability.
3. Install the Hinges
Attach the hinges to the frame, aligning them precisely for smooth operation. Ensure the hinges are strong enough to support the weight of the bed.
4. Construct the Support System
Build the support system based on your plan's specifications. This system will keep the bed upright when it’s not in use. Common support systems include:
- **Wall-mounted brackets:** These brackets fasten to the wall and provide support for the bed.
- **Gas-lift struts:** These struts assist in lifting and lowering the bed.
5. Attach the Platform
Fix the bed platform to the frame, ensuring it is securely fastened. You can use wood slats or a plywood sheet for the platform.
6. Add Storage
If your chosen plan includes storage compartments, build and install them before finishing the bed.
7. Finish the Bed
Sand the bed frame and platform smoothly, then apply your desired finish, such as paint, stain, or varnish. This will protect the wood and enhance its appearance.
8. Install the Bed
Position the bed in its designated location, securing it to the wall or floor for stability. Make sure the support system is properly aligned and functional.

How To Build A Murphy Bed That Easily Transforms Into Desk Diy Family Handyman

Plans A Murphy Bed You Can Build And Afford To Ana White

Diy Murphy Bed Tutorial And

Free Diy Furniture Plans How To Build A Queen Sized Murphy Bed The Design Confidential

Murphy Bed Plans Free

Diy Plan To Build A Murphy Bed Full Size Foldable Plans

How To Build A Horizontal Queen Murphy Bed Amber Oliver

Murphy Bed Woodworking Project Woodsmith Plans

Horizontal Dimensions Ribbonic Wallbed

Diy Horizontal Murphy Bed Woodbrew