Floating Queen Bed Frame DIY: A Step-by-Step Guide
Creating a floating queen bed frame with a DIY approach offers a unique opportunity to enhance bedroom aesthetics and personalize the space. This project, while seemingly complex, can be tackled with careful planning and execution. By following a step-by-step guide, assembling the necessary tools and materials, and understanding the fundamental principles of construction, anyone can successfully build a floating queen bed frame.
This comprehensive guide will outline the essential stages involved in constructing a floating queen bed frame, providing detailed instructions and valuable insights for a seamless process. From selecting the appropriate materials and tools to assembling the frame and integrating the support systems, the steps are presented in a clear and concise manner.
Step 1: Designing and Planning Your Floating Queen Bed Frame
Before embarking on the construction process, careful planning and design are essential. This step involves determining the desired dimensions of the bed frame, considering the size of the queen mattress and the overall aesthetics of the bedroom.
The first crucial decision is selecting the appropriate materials for the bed frame. Common choices include wood, metal, or a combination of both. Wood, particularly hardwoods like oak or maple, provides durability and a classic look. Metal, on the other hand, offers a sleek and modern aesthetic.
Once the materials are chosen, the next step involves creating a detailed blueprint or sketch of the bed frame. This visual representation should illustrate the dimensions, the placement of supporting beams, and the overall design.
Step 2: Gathering the Necessary Tools and Materials
With the design finalized, it is time to gather the necessary tools and materials. The tools required will depend on the specific construction methods and materials selected.
Essential tools commonly used in building a floating queen bed frame include:
- Saw (circular, miter, or table saw)
- Drill with appropriate drill bits
- Screwdriver or drill driver
- Measuring tape
- Level
- Clamps
- Safety glasses and gloves
- Sandpaper
- Wood glue
The materials needed will vary depending on the design and chosen materials, but generally include:
- Wood beams or metal frames
- Brackets and support systems
- Fasteners (screws, nails, or bolts)
- Staining or painting materials (optional)
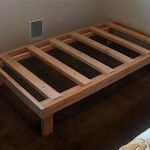
Step 3: Constructing the Bed Frame Base
The construction phase begins with assembling the base of the bed frame. This involves accurately cutting the wood beams or metal frames according to the design blueprint. The base typically consists of two long beams running parallel to each other, creating the platform for the mattress. These beams are connected by shorter beams, known as crosspieces, which provide added support and stability.
When joining the beams, ensure they are accurately aligned and secured with screws, nails, or bolts. It is crucial to use wood glue for added strength and sturdiness. The use of clamps helps to maintain the alignment and pressure during the drying process of the glue.
Step 4: Installing the Support System
The support system is crucial for achieving the floating effect of the bed frame. This typically involves installing brackets or hidden supports that attach to the wall. The brackets should be sturdy enough to handle the weight of the mattress and the user.
The placement of the brackets is dependent on the design and the desired visual effect. Some designs involve placing brackets at the head of the bed, while others might incorporate them along the entire length.
When installing the brackets, ensure they are level and securely attached to the wall. It is highly recommended to use anchors in drywall to provide extra support.
Step 5: Attaching the Bed Frame to the Support System
With the base of the bed frame and the support system in place, the final step is to attach the two components. This connection is crucial for ensuring stability and creating the floating appearance.
The method of attachment will depend on the design and materials used. Some designs involve attaching the bed frame to the brackets using screws or bolts, while others might employ a more intricate system of joints and connectors.
Ensure that the connections are strong and secure to prevent any movement or instability. It is recommended to double-check the alignment and levelness of the bed frame before proceeding to the next stage.

Diy Queen Size Floating Bed Howtospecialist How To Build Step By Plans Frame

How To Build A Diy Floating Bed For Queen Size Mattress Thediyplan

Floating Bed For Queen Size Mattress Thediyplan

Floating Queen Size Platform Bed Plans Howtospecialist How To Build Step By Diy Frame

Diy Queen Size Floating Bed Howtospecialist How To Build Step By Plans

Diy Floating Bed Frames How To Design Plan And Build Them From Scratch

Queen Size Diy Floating Bed Frame

Queen Size Floating Bed Plans

How To Make A Floating Bed Time Lapse

Floating Queen Size Platform Bed Plans Howtospecialist How To Build Step By Diy Frame