Easy DIY Queen Murphy Bed
A Murphy bed, also known as a wall bed, offers a versatile solution for maximizing space, particularly in smaller homes or apartments. With a Murphy bed, a comfortable sleeping space can be tucked away when not in use, freeing up valuable floor area for other activities. While professionally installed Murphy beds can be expensive, a do-it-yourself approach offers a cost-effective alternative. This article provides a comprehensive guide to building a queen-size Murphy bed, breaking down the process into manageable steps.
Planning and Preparation
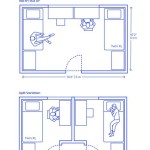
Careful planning is essential for a successful Murphy bed project. Begin by determining the available wall space and ensuring it is structurally sound enough to support the bed's weight. Accurate measurements are crucial. The sleeping area will require enough clearance for the mattress and frame when lowered. Additionally, consider the surrounding furniture and ensure sufficient space for the bed to swing down without obstruction. Creating a detailed sketch or using design software can help visualize the project and identify potential challenges.
Selecting the right materials is equally important. High-quality plywood is recommended for the bed frame due to its strength and stability. The hardware, including hinges, pistons, and fasteners, should be robust enough to handle the bed's weight and frequent movement. Choose a comfortable mattress that is compatible with the dimensions of the frame. Finally, gather all necessary tools, including a circular saw, drill, level, measuring tape, and safety equipment like goggles and gloves.
Building the Bed Frame
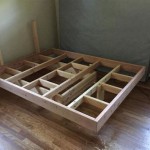
The bed frame constitutes the core structure of the Murphy bed. Begin by cutting the plywood according to the planned dimensions. The frame typically consists of a rectangular box designed to enclose the mattress. Reinforcement is critical for durability. Adding supporting crossbeams within the frame will enhance its structural integrity and prevent sagging. Precisely assembling the frame pieces is essential, ensuring square corners and a level surface. Employing wood glue and screws will provide a secure and long-lasting bond.
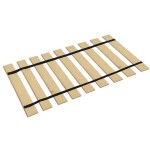
Next, install the mattress supports. These can be simple wooden slats or a more elaborate platform. The supports should be securely fastened to the frame, providing a stable base for the mattress. After completing the frame, attach the necessary hardware. Heavy-duty hinges will connect the frame to the wall cabinet. Gas pistons are essential for smooth and controlled movement of the bed, counterbalancing its weight and making it easy to raise and lower. Installing the pistons requires careful attention to the manufacturer's instructions, ensuring they are positioned correctly for optimal performance.
Constructing the Wall Cabinet
The wall cabinet serves as both a housing for the bed when it's folded up and a decorative element in the room. The cabinet dimensions should precisely accommodate the bed frame, leaving minimal gaps. Similar to the bed frame, the cabinet is typically constructed from plywood. Cutting the pieces accurately and assembling them squarely is crucial for a professional finish.
Reinforce the cabinet structure with internal bracing to support the weight of the bed. The cabinet will be mounted directly to the wall studs, requiring careful positioning and secure anchoring. Before mounting the cabinet, ensure the wall is suitable for the load. Using a stud finder will locate the wall studs for secure attachment. Once the cabinet is mounted, attach the bed frame to the cabinet using the previously installed hinges. Test the movement of the bed, ensuring it operates smoothly and the pistons function correctly. Finally, add finishing touches to the cabinet, such as doors, trim, and paint, to seamlessly integrate it into the room's decor.
Safety Mechanisms
Safety is paramount when building a Murphy bed. Incorporating safety mechanisms is crucial to prevent accidents. Leg supports are necessary to stabilize the bed when it's in the lowered position. These supports should lock securely in place to prevent the bed from collapsing. Additionally, consider installing a locking mechanism to secure the bed in both the raised and lowered positions. This can be a simple latch or a more complex locking system.
Thoroughly test all mechanisms after installation. Repeatedly raise and lower the bed to verify smooth operation and ensure all components function as intended. Inspect all hardware regularly for signs of wear and tear, replacing any damaged parts promptly. Finally, consider adding safety labels and instructions to the bed for users unfamiliar with its operation. These safety measures will ensure that the DIY Murphy bed provides a safe and comfortable sleeping solution.

Queen Size Murphy Bed Hardware Kit Horizontal Sideways Easy Diy

Queen Size Murphy Bed Hardware Kit Horizontal Sideways Easy Diy

How To Build A Gorgeous Diy Murphy Bed Using Hardware Kit Plans

Diy Murphy Bed Tutorial And

Free Diy Furniture Plans How To Build A Queen Sized Murphy Bed The Design Confidential

Diy Murphy Bed For Under 150 With Plans Your Modern Family Wall Build A

Diy Murphy Bed Without Expensive Hardware

Plans A Murphy Bed You Can Build And Afford To Ana White

Diy Murphy Bed Tutorial And

How To Build A Queen Size Murphy Bed