DIY Wood Queen Bed Frame: A Comprehensive Guide for Home Decorators
Creating a DIY wood queen bed frame is a rewarding project that adds a touch of personal style and functionality to your bedroom. With the right materials, tools, and techniques, you can craft a durable and stylish centerpiece that will enhance the ambiance of your space. This comprehensive guide will provide you with all the essential steps and considerations to build a stunning wood queen bed frame that meets your needs and enhances your home decor.
Choosing the Right Lumber
The choice of lumber is crucial for the durability and longevity of your bed frame. Opt for hardwood species like oak, maple, or cherry, which offer strength, resistance to wear and tear, and a beautiful grain. Consider the overall aesthetic you want to achieve when selecting the wood type, as different species have unique colors and textures.
Tools and Materials Required
Gather the essential tools and materials before embarking on your project. You will need: - Circular saw or miter saw - Drill and driver - Screws and bolts - Wood glue - Measuring tape and level - Clamps - Sandpaper or sander - Wood finish (optional)
Step-by-Step Building Instructions
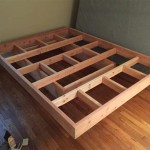
1. Cut the Frame PiecesMeasure and cut the four side rails and two headboard and footboard pieces according to your desired bed frame dimensions. Ensure the cuts are precise and at right angles.
2. Assemble the FrameLay out the side rails and headboard and footboard pieces on a flat surface. Apply wood glue to the joints and secure them with screws or bolts. Use clamps to hold the pieces firmly in place as the glue dries.
3. Reinforce the CornersTo enhance the strength of the frame, reinforce the corners with corner brackets or L-brackets. Check the alignment and squareness of the frame using a level.
4. Attach the SlatsCut several wooden slats to fit the width of the bed frame. These slats will support the mattress. Space them evenly across the frame and secure them with screws.
5. Finishing TouchesIf desired, sand the frame smooth to remove any rough edges. Apply a wood finish, such as stain, paint, or clear varnish, to protect the wood and enhance its appearance. Allow the finish to dry completely.
Customizing Your Bed Frame
Beyond the basic construction, you can customize your bed frame to reflect your style and preferences. Here are a few ideas: - Add decorative moldings or carvings to the headboard and footboard. - Paint or stain the frame in a color that complements your bedroom decor. - Install under-bed storage drawers for additional functionality.
Enjoy Your Custom Wood Bed Frame
Once complete, step back and admire your handiwork. Your DIY wood queen bed frame is not only a practical addition to your bedroom but also a testament to your creativity and craftsmanship. Enjoy the satisfaction of having built a piece of furniture that will serve you for years to come.

Diy Bed Frame Wood Headboard 1500 Look For 200 A Piece Of Rainbow

Diy Bed Frame Wood Headboard 1500 Look For 200 A Piece Of Rainbow

Diy Bed Frame Plans How To Make A With Pete
:max_bytes(150000):strip_icc()/diycandy-97114db35d884d62b464a51cd9e1e9f9.jpg?strip=all)
21 Diy Bed Frames You Can Build Right Now

Essential Platform Bed Frame Ana White

Simple Queen Bed Frame Diy Plans
:max_bytes(150000):strip_icc()/vivaveltoro-d12538d3f4da4aa38e620f5b394d5bea.jpg?strip=all)
21 Diy Bed Frames You Can Build Right Now

Diy Bed Frame Wood Headboard 1500 Look For 200 A Piece Of Rainbow

Diy Full Or Queen Size Storage Bed Shanty 2 Chic
:max_bytes(150000):strip_icc()/apieceofrainbow-a4ac6d2cd6dc4b9694e33e80592b797f.jpg?strip=all)
21 Diy Bed Frames You Can Build Right Now
