DIY Queen Bunk Beds
Building queen-size bunk beds presents a significant undertaking, but it offers considerable rewards. It provides a space-saving solution for families and guests, maximizing sleeping capacity without expanding the room's footprint. This project also offers a unique opportunity to customize the design and aesthetics to perfectly match existing décor or a desired theme. However, due to the size and weight involved, careful planning and precise execution are crucial for safety and structural integrity.
Planning and Design
Before beginning construction, a detailed plan is essential. This includes accurate measurements of the intended space, considering ceiling height and room layout. Sketching the design helps visualize the final product and identify potential challenges. Choosing the appropriate materials is crucial; sturdy lumber like pine or fir is recommended for the frame. The design should incorporate adequate support for the weight of two queen-size mattresses and occupants. Consulting building codes and regulations ensures the structure meets safety standards.
Software like SketchUp can be used to create a 3D model, allowing for a better understanding of the final structure. This allows for adjustments to the design before materials are purchased. Calculating lumber requirements precisely minimizes waste and ensures sufficient materials are on hand. Detailed plans should include specific dimensions for all components, including posts, rails, slats, and support beams.
Material Selection and Preparation
Selecting high-quality lumber is paramount for structural integrity. Look for kiln-dried lumber to minimize warping and cracking. Pressure-treated lumber is recommended for components that may be exposed to moisture. All lumber should be inspected for knots, splits, and other imperfections before purchase. Once acquired, the lumber should be acclimated to the room's environment for a few days before construction begins.
Accurate cutting and pre-drilling of holes are essential for a smooth assembly process. Using a miter saw ensures precise angles for a professional finish. Pre-drilling pilot holes prevents wood from splitting when screws are inserted. Sanding all surfaces provides a smooth finish and enhances the final appearance. All cut ends should be sealed with a wood sealant to protect against moisture and insects.
Construction and Assembly
Begin by constructing the individual bed frames. These frames should be robust and able to support the weight of a queen-size mattress and occupants. Reinforcements, such as center supports and corner braces, are essential for stability. Ensure the frames are square and level before proceeding to the next step. The use of wood glue in conjunction with screws strengthens the joints and enhances the overall structural integrity.
Once the individual frames are complete, assemble the bunk bed structure. Securely attach the upper frame to the lower frame using heavy-duty hardware. Utilize strong posts and rails to provide adequate support and prevent swaying. Regularly check for squareness and levelness during assembly to avoid structural issues. Clamps can be invaluable during this process, holding pieces in place while securing them with screws.
Safety Features and Finishing Touches
Safety should be a primary concern throughout the project. Install guardrails on the upper bunk that are high enough to prevent falls. Ensure the ladder is securely attached and positioned for easy access. The ladder rungs should be evenly spaced and provide a comfortable grip. Consider adding a safety rail to the lower bunk for added security, especially for younger children.
After the structure is assembled, add the finishing touches. Sanding all surfaces creates a smooth finish, ready for painting or staining. Choose a finish that complements the room’s décor. Applying multiple coats of sealant protects the wood and enhances its longevity. Consider adding personalized elements, such as built-in storage or lighting, to enhance functionality and aesthetics.
Adding the Mattress and Bedding
Once the finish is dry, carefully place the mattresses on the bunk beds. Ensure the mattresses fit snugly within the frames. Add bedding that complements the room’s design and provides comfort. Consider the height of the upper bunk when choosing bedding to ensure adequate headroom. Regularly inspect the structure for any signs of wear and tear, and tighten any loose screws or bolts promptly.

17 Easy Steps For A Diy Built In Bunk Bed Start At Home Decor

Diy Built In Bunk Beds Lauren Koster Creative

Queen Builtin Bunks Reveal Honey Built Home

Diy Queen Over Loft Bed Plan Step By Guide For

17 Easy Steps For A Diy Built In Bunk Bed Start At Home Decor

Queen Builtin Bunks Reveal Honey Built Home

17 Easy Steps For A Diy Built In Bunk Bed Start At Home Decor

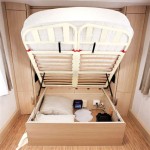
Multifunctional Queen Size Bunk Bed With Storage Area Plan

How To Build A Built In Bunk Bed Plank And Pillow

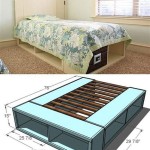
Easy Diy Queen Size Loft Bed Plans For S Do
Related Posts