Blackstone Queen Upholstered Square Stitched Platform Bed Assembly Instructions
The Blackstone Queen Upholstered Square Stitched Platform Bed is a stylish and comfortable addition to any bedroom. Its upholstered headboard and frame add a touch of sophistication, while the square stitching adds a unique detail. Assembling this bed may seem daunting, but with clear instructions and a bit of patience, it can be a straightforward process.
Step 1: Gather Materials and Tools
Before beginning the assembly process, ensure you have all necessary materials and tools. These typically include:
- Blackstone Queen Upholstered Square Stitched Platform Bed components (headboard, footboard, side rails, slats, hardware)
- Phillips head screwdriver
- Allen wrench set
- Hammer (optional, for securing slats)
- Level (optional, for ensuring the bed is level)
- Work surface (large enough to lay out the bed frame)
It's also advisable to have a helper for certain steps, particularly when lifting and positioning the heavier components.
Step 2: Assembling the Headboard and Footboard
Start by assembling the headboard and footboard. These sections usually have pre-drilled holes for attaching the legs and connecting hardware. Follow the instructions provided, aligning the pieces and securely attaching them using the appropriate screws or bolts. Use a level to ensure the headboard and footboard are straight and even.
Step 3: Attaching the Side Rails
Once the headboard and footboard are assembled, it's time to attach the side rails. These rails typically connect to the headboard and footboard using pre-drilled holes and provided hardware. Ensure the side rails are aligned with the headboard and footboard and securely fastened. Double-check the alignment and stability of the frame before proceeding.
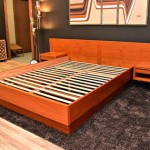
Step 4: Installing the Slats
The slats provide support for the mattress and are usually attached to the side rails. Some beds may use metal slats that simply slide into place, while others require attaching individual slats using screws or clips. Refer to the instructions provided with your specific model. Ensure the slats are evenly spaced and secure before moving on to the next step.
Step 5: Final Adjustments and Positioning
Once the frame is fully assembled, it’s time for final adjustments and positioning. Double-check that all hardware is tight and secure. Ensure the bed frame is level and stable. Use a level to adjust the legs, if necessary, for proper support.
After ensuring the bed is adequately assembled and stable, it's ready for its final positioning in the desired location. Place the bed in its desired location, making sure it's away from electrical outlets and other obstacles.
By following these instructions and taking your time, you can successfully assemble your Blackstone Queen Upholstered Square Stitched Platform Bed. Remember to always refer to the specific instructions provided with your model, as steps and hardware may vary. If you encounter any difficulties, consult your owner's manual or contact customer support for further assistance.

Blackstone By Zinus Upholstered Square Stitched Platform Bed Costco

Blackstone By Zinus Upholstered Square Stitched Platform Bed Costco

How To Setup A Zinus Dark Gray Upholstered Square Stitched Queen Sized Platform Bed And Review

Blackstone Upholstered Grand On Tufted Platform Bed Unboxing Assembly Full Instruction Manual

Studio Home Charcoal Square Stitched Upholstered Queen Platform Bed Temple Webster

Studio Home Charcoal Square Stitched Upholstered Queen Platform Bed Temple Webster

Studio Home Charcoal Square Stitched Upholstered Queen Platform Bed Temple Webster

Uhomepro Queen Bed Frame Modern Upholstered Platform With Square Tufted Headboard Heavy Duty Wood Slat Support No Box Spring Required Gray Com

Zinus Dark Grey Upholstered Square Stitched Platform Bed With Wooden Slats Review

Queen Size Upholstered Platform Bed Linen Frame With 9 Colors Lights Wooden Square Stitched Adjustable Headboard And Strong Slats System No Box Spring Needed Gray Com